Showing posts with label Home-made. Show all posts

Wednesday, 13 April 2016

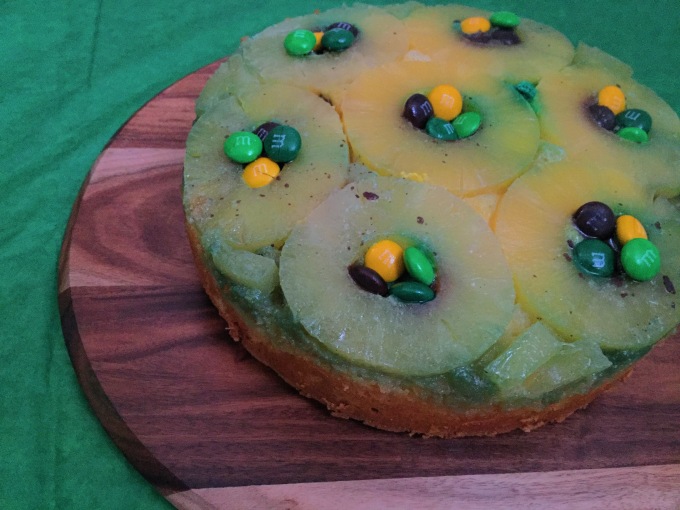
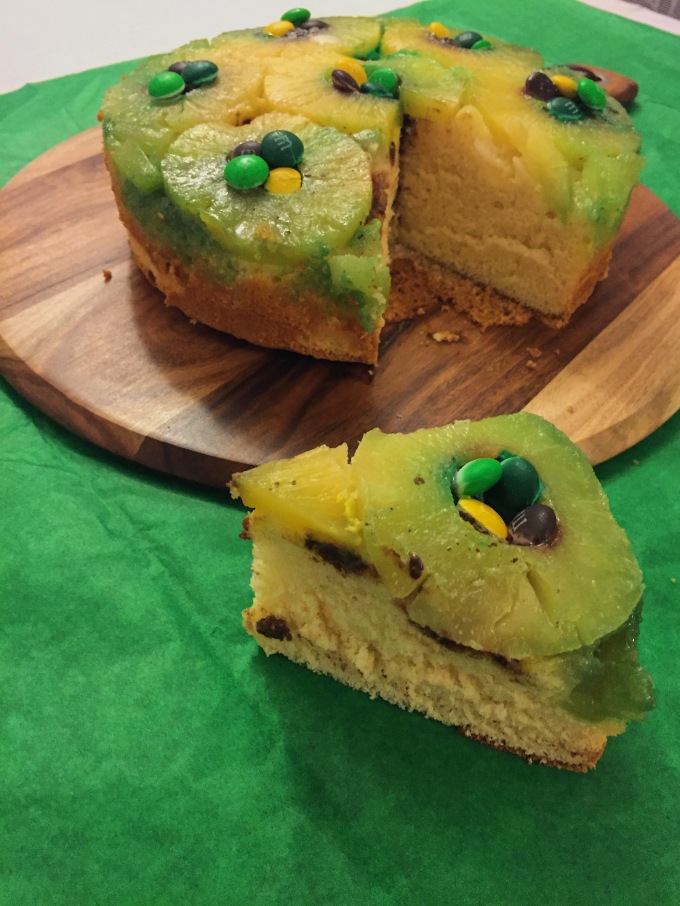
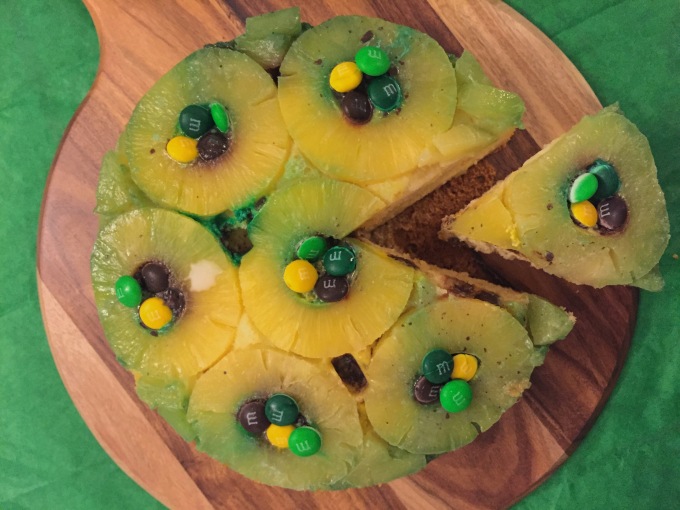
How To: Pineapple M&Ms Upside Down Cake

Hi Nibblers!

        A few weeks ago, Kevin's Dad turned 50! I didn't have much time to prepare as shift work had my hours all over the place so I needed a cake that was easy and delicious. My only brief was to make it fruity. I was thinking of no bake desserts but nothing really stood out in my mind and mostly incorporated rich chocolate flavours. I rummaged through the pantry and stumbled across a can of pineapples. 'That's it!' I thought and it was then the recipe was born.
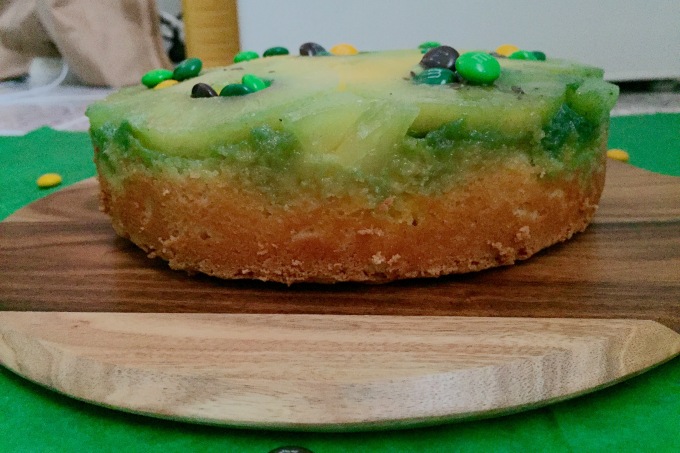
        This cake turned out moist and with the slight tartness of the pineapple it ticked all boxes. I added pineapple flavoured M&Ms to the cake for decorative purposes however felt it took away from the natural flavours so feel free to omit that completely. I did pop some in the pan while it was baking but the M&Ms melted hence gave the cake a green hue. I can definitely say it worked in theory but was probably not my best idea. All in all, still a great tasting cake and definitely one you should make if you're short on time!
 

How To: Pineapple M&Ms Upside Down Cake
FullSizeRender
Makes one 20cm tin cake - serves 8-10
What you'll need:
- 525g of tinned pineapple rings (in pineapple juice)
- 3 eggs (separated)
-150g or 2/3 cup of sugar
- 150g or 1 cup of self raising flour
2 tsp. Vanilla essence
- 100mL pineapple juice (from can)
- 30g unsalted butter (melted)
- 30g brown sugar
- 100g Pineapple flavoured M&Ms (optional)
 
How To:
1. Place melted unsalted butter into baking tin and spread even around sides
2. Sprinkle brown sugar evenly on base of tin then set asideIMG_2395
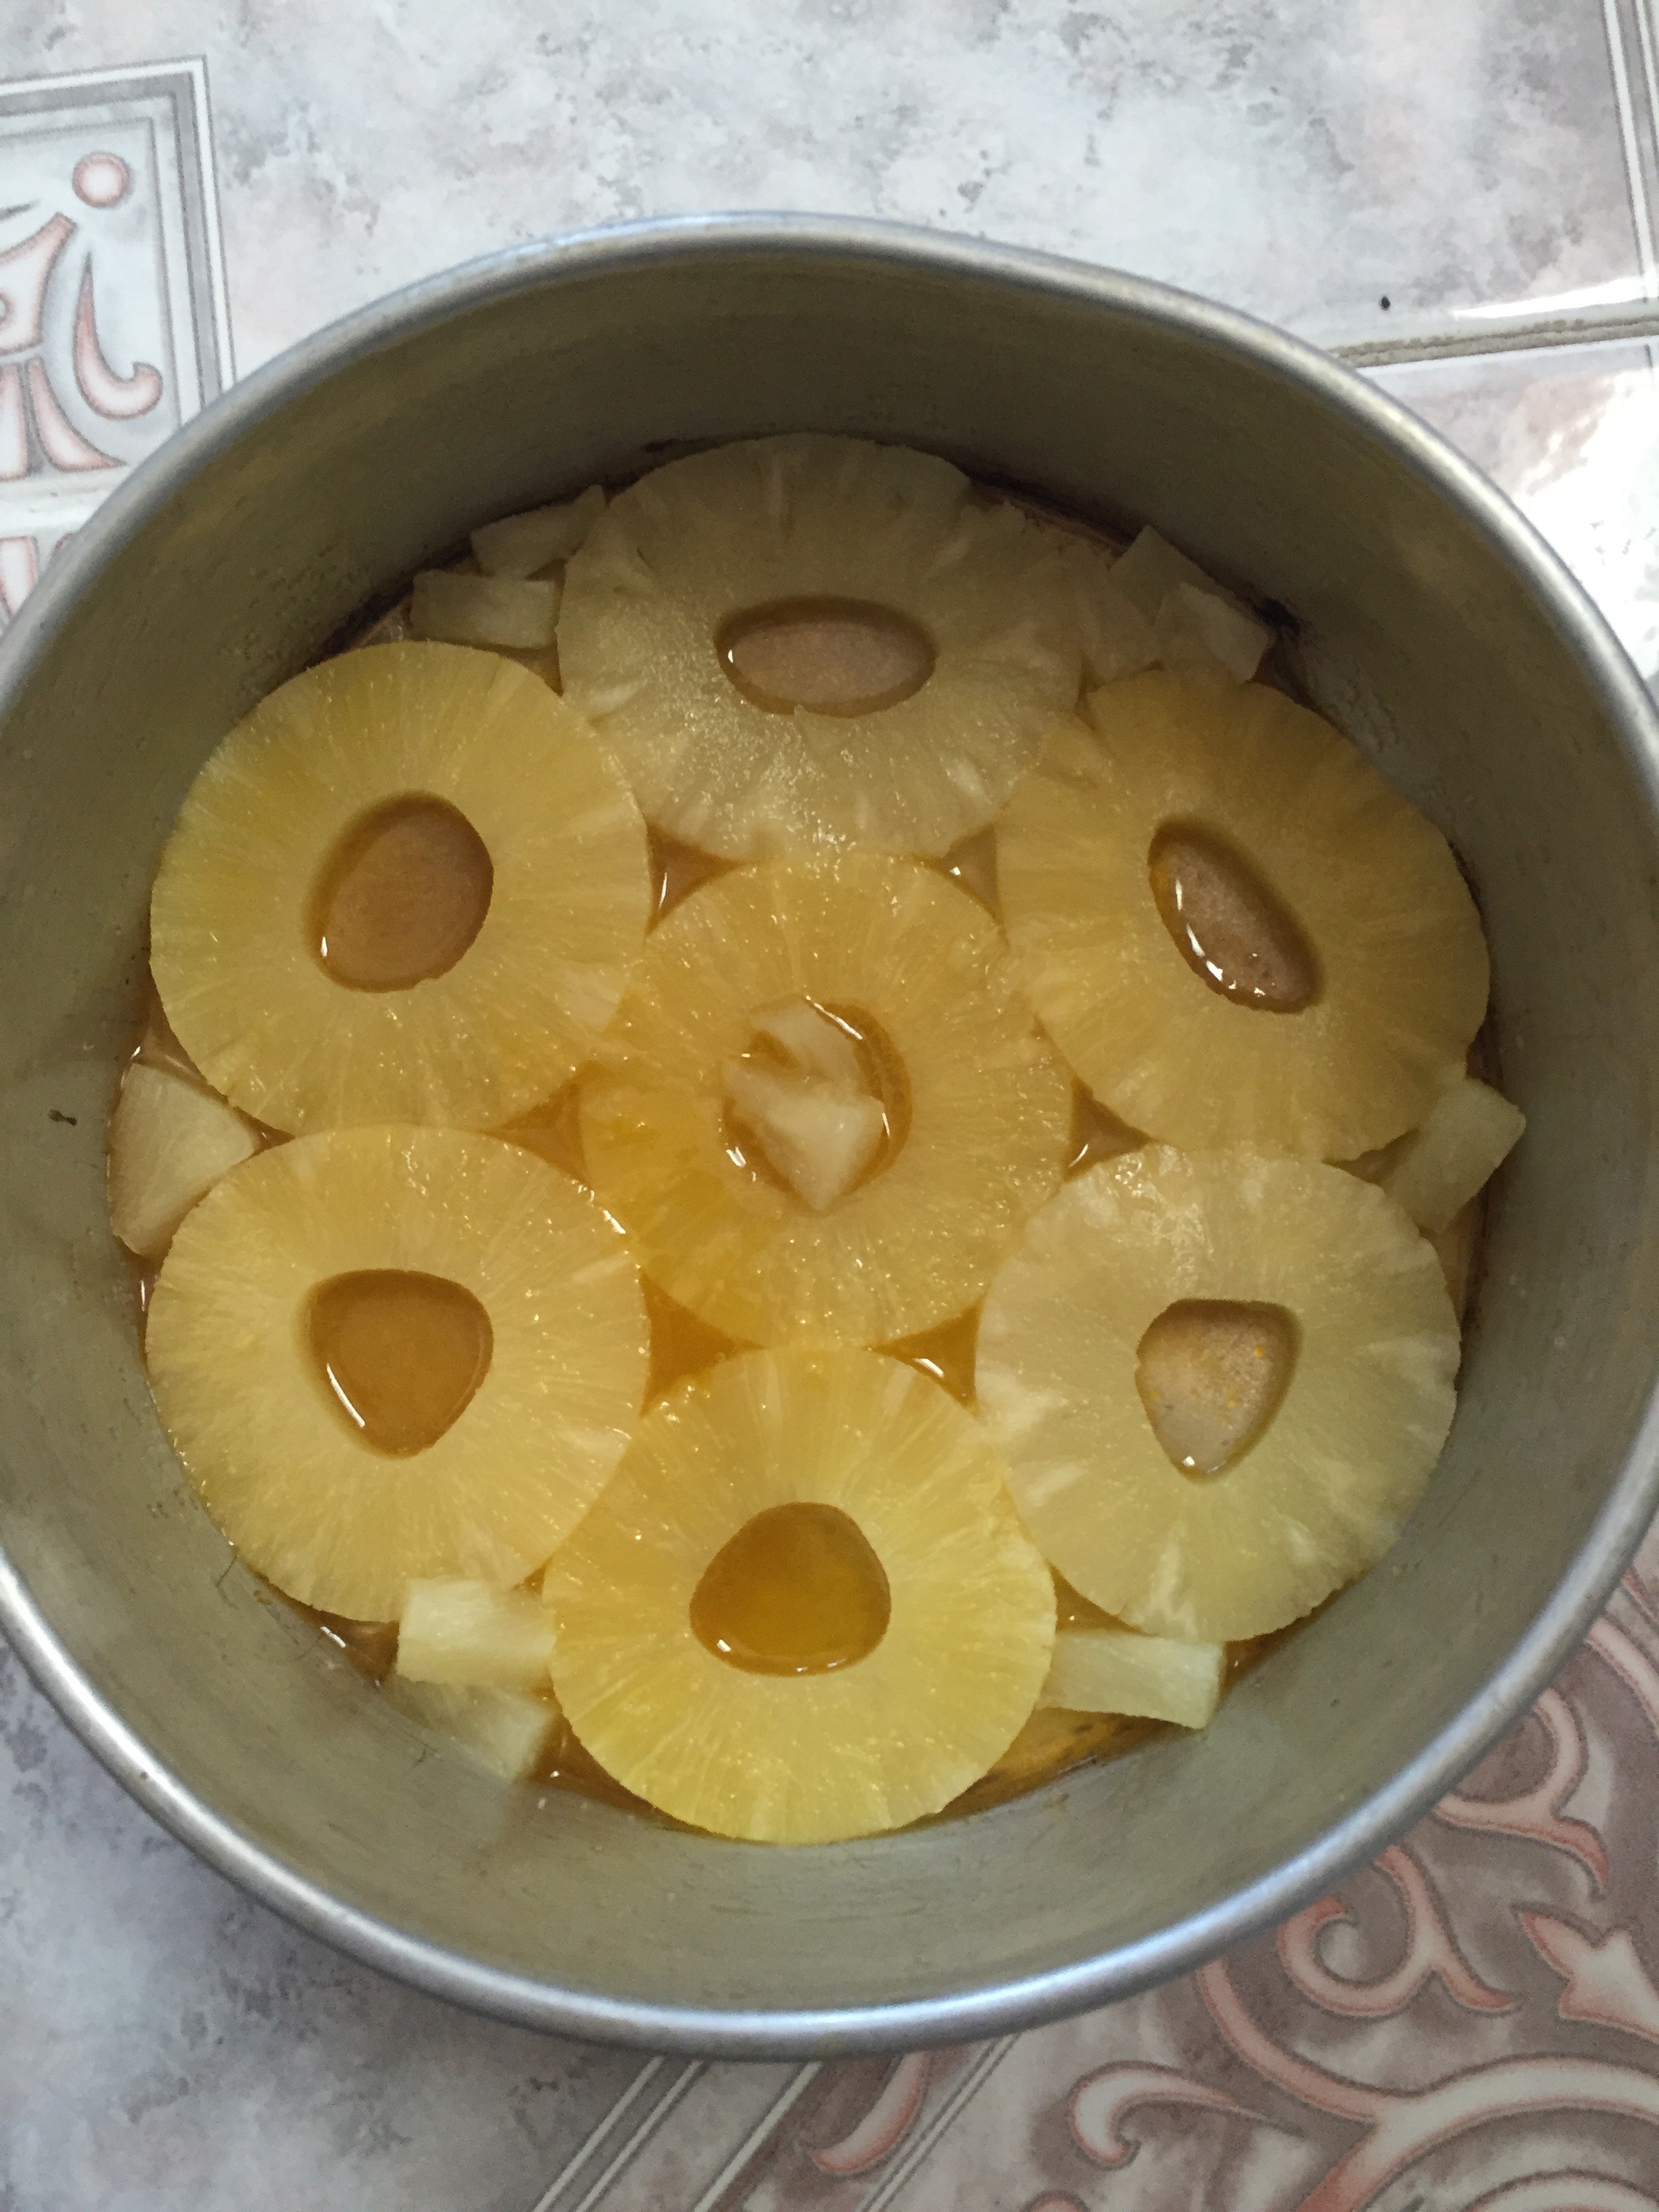
3. Line pineapples rings on base of cake tin to cover all covers (Optional: Place M&Ms in any empty spaces) then roughly dice remaining pineapple pieces then set aside
4. Preheat oven to 180 degrees Celcius or 375 degrees Farenheit
5. Beat separated egg whites on high until fluffy then add 2/3 cups of sugar and continue beating until stiff peaks form then set aside
6. In a seperate bowl, mix egg yolks, vanilla essence, remaining pineapple pieces and pineapple juice until well combined - (Optional - add remaining M&Ms)
7. Slowly fold in flour and beaten egg white/sugar into yolky mix approximaIMG_2394tely a third of each mixture each time until all well incorporated
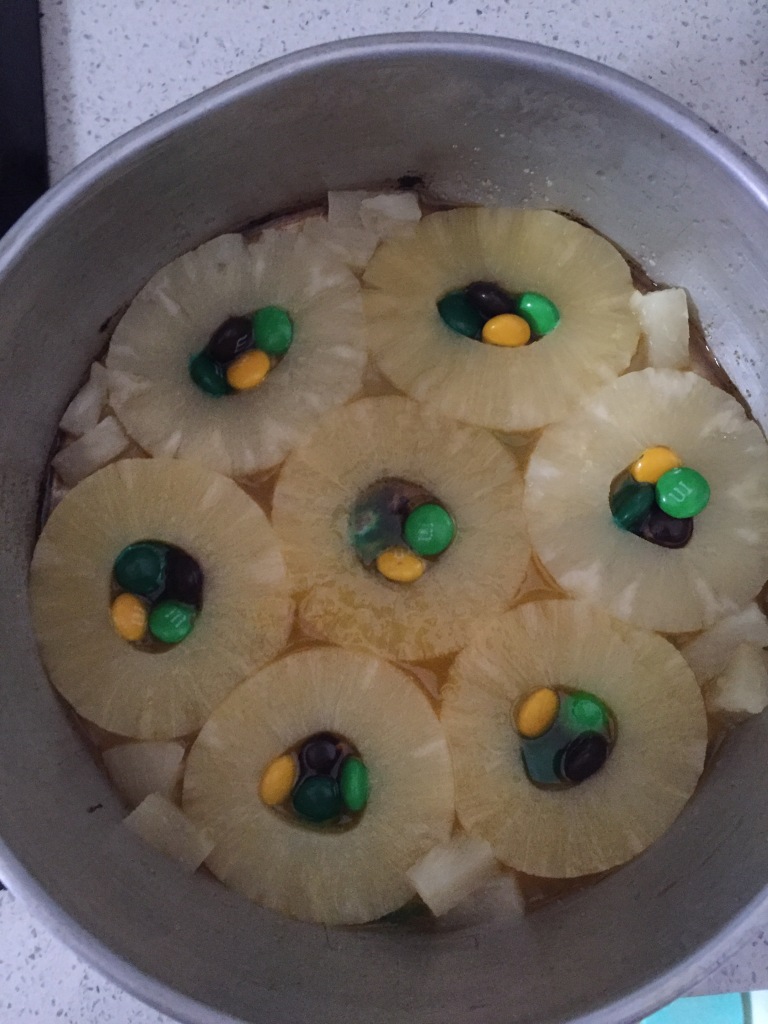
8. Pour cake mixture evenly into tin
9. Pop cake into oven for approximately 30 minutes or until skewer pops out clean
10. Remove from oven then leave to cool for 10 minutes then remove from tin before serving
 
              I loved the end result of this cake. Made in no time and the sponge was oh so soft. It definitely received some rave reviews. If you do give this a go please make sure to leave a comment below letting me how you go!
                Before I end this post, I also wanted to say thank you for sticking by me for the past three years. I've enjoyed every bit of it and it's been amazing to see how much I've improved in these few years. To celebrate, I have decided to move Nibble Nation to a new platform - Wordpress. All my old content has all been imported over and I will no longer be posting to my blogspot account. So, you'll still be able to access everything I have ever posted. If you haven't already and would like to follow me on the next chapter, head to nibblenation.wordpress.com ! I hope to see you there and hope you like the look. It was hard work to start off with but I'm loving the templates on Wordpress and believe things can only improve here on in.
                 FullSizeRender 
FullSizeRender
FullSizeRender
Until next time

            Nibble Away,

                            Jo

Friday, 25 March 2016

How To: Rocky Road Bunny Pops (Easter Special)

Hi Nibblers!

      Can you believe it? Easter is already here! How quickly has the year gone by? It feels like only yesterday that I was putting up the Christmas tree and opening gifts. I was perusing my instagram feed as I usually do in the morning and found an array of amazing Easter desserts. Cute bunny cupcakes, cake pops and Easter eggs galore - I love it all. I wanted to make something simple so I could focus on the artsy bit of the recipe. It definitely took a good chunk of my afternoon but the end result is too adorable to handle so it's all worth it.

How To: Rocky Road Bunny Pops (Easter Special)


What you'll need:
Makes roughly 24 bunny pops
 - 8 paper plates
- Sticky tape
- Scissors
- Paddle Pop sticks
- 200g roast hazelnut milk chocolate block
- 200g almond chocolate block
- 200g dark chocolate block
- 1/2 cup desiccated coconut
- 250g marshmallows (quartered)
- An extra 20 marshmallows (roughly 100g)
- 150g Jubes (halved)
- 600g white chocolate buttons
- A handful of chocolate buttons for bunny's eyes
- One pink marshmallow cut into small pieces for bunny's nose (24 pieces)
- Black icing writing pen
Optional:
To help with drying process / display, pierce 1cm cuts into a styrofoam board to place bunny pops into to dry. If you can only find styrofoam balls, use masking tape to tape balls side by side to make a rectangular board for bunny pops to sit in

How To:
1. Roll paper plates into a cylinder with a diameter of roughly 3cm then tape together
2. Cut cylinders into three equal rolls then tape one end to close the cylinder roll then set aside until needed
3. Mix quartered marshmallows, jubes, and coconut into a bowl then set aside
4. In the microwave or over a double boiler, melt hazelnut, almond and dark chocolate blocks together until smooth and creamy
5. Add melted chocolate over the sweets bowl and mix until well combined
6. Divide evenly in between each cylinder then pop into fridge to set for at least 3 hours (Pop paddle pop sticks into the middle of each chocholate cylinder approximately an hour through setting process)
7. In the microwave or over a double boiler, melt white chocolate until smooth then remove from heat
8. Remove paper from chocolate moulds then dip one half of a marshmallow into white chocolate then stick marshmallow to the top left of the cylinder chocolate pieces
9. Repeat step 8 and place halved marshmallows to the top right
10. Repeat steps 8 and 9 until all chocolate cylinders have bunny ears then place into the fridge to set for ten minutes
11. Dip all bunny heads into white chocolate one at a time until well coated then quickly pop two chocolate buttons to act as the bunny's eyes and a small marshmallow piece directly underneath and in the centre for bunny's nose then set aside to set in fridge for 10 minutes
12. Once dry, draw whiskers and mouth onto bunny's face then enjoy!
Ready to set!
All set :)


           I love the way these pops turned out. Deliciously chocolate centres and super cute for any occasion. These were a great hit at work so definitely give this one a go. Hope you're all having a lovely day and enjoy the rest of the Easter weekend.

NOM NOM!

Nibble Away,
         
           Jo

Thursday, 17 March 2016

How To: 'Golden Gaytime' Cheesecake

Hi Nibblers!

          One of my best friends Thao celebrated her 23rd birthday a few months ago. She was overseas on her actual birthday so we had a belated celebration. Thao and I have known each other for half our lives. We had actually crossed paths at an after school tutoring class but didn't know we actually went to the same school. We were in two different classes and it was too early in the year to know anyone else in the grade. It wasn't until school had finally started and we both rocked up in our matching uniforms to the tutoring class that we were acquainted. From then, we hung out together at school together during breaks and have been trucking along since.
           What I love about our friendship apart from all the giggles we have is our love for food. Thao has been a lover of cheesecake for as long as I can remember. Unfortunately for me, cheesecake hasn't been on the top of my list. I do understand the cheesecake hype though. Crunchy biscuit base, smooth velvet centre with a zesty kick, who couldn't fall in love with it? However, after years of being in denial and peering over at Thao when she's had a cheesecake in hand has converted me. So, in celebration of our friendship and to honour her love of cheesecake I surprised her with one for her birthday. By now you Nibblers know that I love to experiment so, I decided to combine an Aussie classic dessert 'The Golden Gaytime' (also one of Thao's favourites) and cheesecake together. This recipe turned out exactly how I envisioned and luckily for me, it was a hit with her! I'm so happy with how this turned out and now you guys can give it a go too.

How To: 'Golden Gaytime' Cheesecake


Makes one 20cm x 20cm cheesecake
What you'll need:
Base:
- 75g unsalted butter (melted)
- 100g biscuits (I just used a simple digestive biscuit)
- 150g honeycomb chocolate bars (I used Crunchie bars)
Filling:
- 300mL thickened full cream
- 3 Tbs. white sugar
- 250g cream cheese
- 1 tsp. vanilla
- 1/2 tsp. lemon juice
- 50g Jersey caramels
- 2 Tbs. milk
Topping:
- 1/4 cup of granulated peanuts (roasted)

How To:
Base:
1. Place crushed biscuits and honeycomb into a sealed bag or food processor and crush until it roughly resembles bread crumbs
2. Add melted butter to mix and combine until well coated
3. Place buttery biscuit mix into cake tin and evenly spread across base of tin and sides to form a cup well for filling to go into later - use a cup to help press down on biscuit mix for a more even look then place in fridge to set or until needed
Filling:
1. Pop caramels and milk into a heat proof bowl and melt caramels until smooth (either quick pulses at 30 seconds each time in the microwave - stirring in between or a double boiler method) then set aside to cool
2. Beat thickened cream and sugar until firm stiff peaks form then set aside
3. In a seperate bowl, beat vanilla, lemon juice and cream cheese until well combined
4. Fold thickened cream and cream cheese until well mixed
5. Place filling mixture into tin and smooth around to the edges

6. Spoon small amounts of caramel sauce around the cream cheese/cream and then using a skewer, swirl around to create a marble effect
7. Sprinkle roasted granulated nuts over cheesecake the place cheesecake to set for at least 4 hours before serving!

             This recipe was so simple to make and definitely a crowd pleaser. With a lovely honey combed biscuit base, zesty cheese filling with hints of caramel goodness and a peanut crunch on top it certainly sounds like every 'Golden Gaytime' I've ever eaten. I hope you enjoyed this recipe! If you do give it a go, be sure to comment below.

Nibble Away,

                    Jo


Saturday, 5 March 2016

How To: Apple and Custard Buttercream Cupcakes

Hi Nibblers!

           When life gives you lemons, you make lemonade. It's been a tough month since I last posted with the passing of my Grandma. She was battling lung cancer for almost two years. She was never a smoker which made her illness difficult to accept. My Grandma was always so loving and caring. She just took things as they came and willing to help those in need even if it made things a little more difficult for her.

            My most fondest memory of my grandma was when she was recovering after a lung surgery in hospital. She was not able to speak a word of english nor understood what anyone said but she would happily parade to other patient's beds beside her, telling them about her life - all in Vietnamese. I would giggle every time she did so. She didn't care that they didn't understand her. She just continued on her day with no care. She hugged the nurses and thanked them when she was discharged. Offered them fruit as they were passing by and never complained as they attended to her observations. She tolerated pain well but it was heartbreaking to watch. Her hands painted with bruises from missed cannulas but she shrugged them off as her motivation to live outweighed the rest.
           I would be lying if I said that looking after my Grandma in hospital wasn't tiring. It was extremely exhausting and emotionally draining. As her cancer progressed, her symptoms worsened. She was unable to eat, confused and lost her quality of life. It definitely took its toll on the family. But, I don't want to replay those melancholy memories anymore. I want to remember my Grandma smiling. I want to remember the amazing things my Grandma did to build a new life in a foreign land despite a war. I want to remember her babysitting me as a toddler and how I used to hide under tables and have her look everywhere for me. I am so lucky I had the chance to see my Grandma through the ups and lows. Looking back, as weary as I may have been, it has been such a great privilege to look after my Grandma and I am forever grateful for the love I have experienced knowing her. This recipe was the last experiment I was able to share with my Grandma. She may not have had the strength to eat them but I'm glad she at least had the chance to see them.

How To: Apple and Custard Buttercream Cupcakes
Makes approx. 12 medium sized cupcakes


What you'll need:
Apple Cupcakes:
- 2 medium apples (peeled and diced into rough 0.5cm cubes)
- 170g self raising flour
- 1/4 cup of milk
- 1 Tbs. cinnamon
- 2 eggs
- 125mL oil
- 90g brown sugar
Custard Buttercream:
- 500g unsalted butter (room temperature)
- 1 tsp. vanilla essence
- 4 tsp. instant custard powder
- 2 Tbs. warm milk
- 200g icing sugar (sifted)

How To:
Apple Cupcakes
1. Pre-heat oven to 180 degrees Celsius
2. Line cupcake tin with patty tin liners then set aside
3. Mix flour, sugar and cinnamon in bowl then set aside
4. Beat oil, milk and eggs together until combined
5. Form a well in the middle of dry ingredients then add wet ingredients and stir until well combined
6. Fold apples through 
7. Evenly divide batter into cupcake tin
8. Pop into the oven for 16 minutes then set aside to cool - remember to check if they're cooked by inserting a skewer to ensure no batter sticks to it!
Custard Buttercream:
1. Beat butter on high for approximately 5 minutes until butter turns from yellow to off white tone
2. In a seperate bowl, combine warm milk with custard powder and mix until dissolved
3. Add custard/milk mixture, vanilla essence and icing sugar to butter and mix until well combined - approximately 6 minutes until light and fluffy
4. Once cupcakes are cooled, decorate as desired! - Enjoy!

         I hope you enjoyed this recipe! These cupcakes turned out exactly how I envisioned them and I couldn't be happier with the taste. They were moist, creamy with a lovely tart crunch from the apples. Thank you Nibblers for your continued support! Stay tuned for more recipes to come!


Nibble Away,
   
               Jo

Tuesday, 19 January 2016

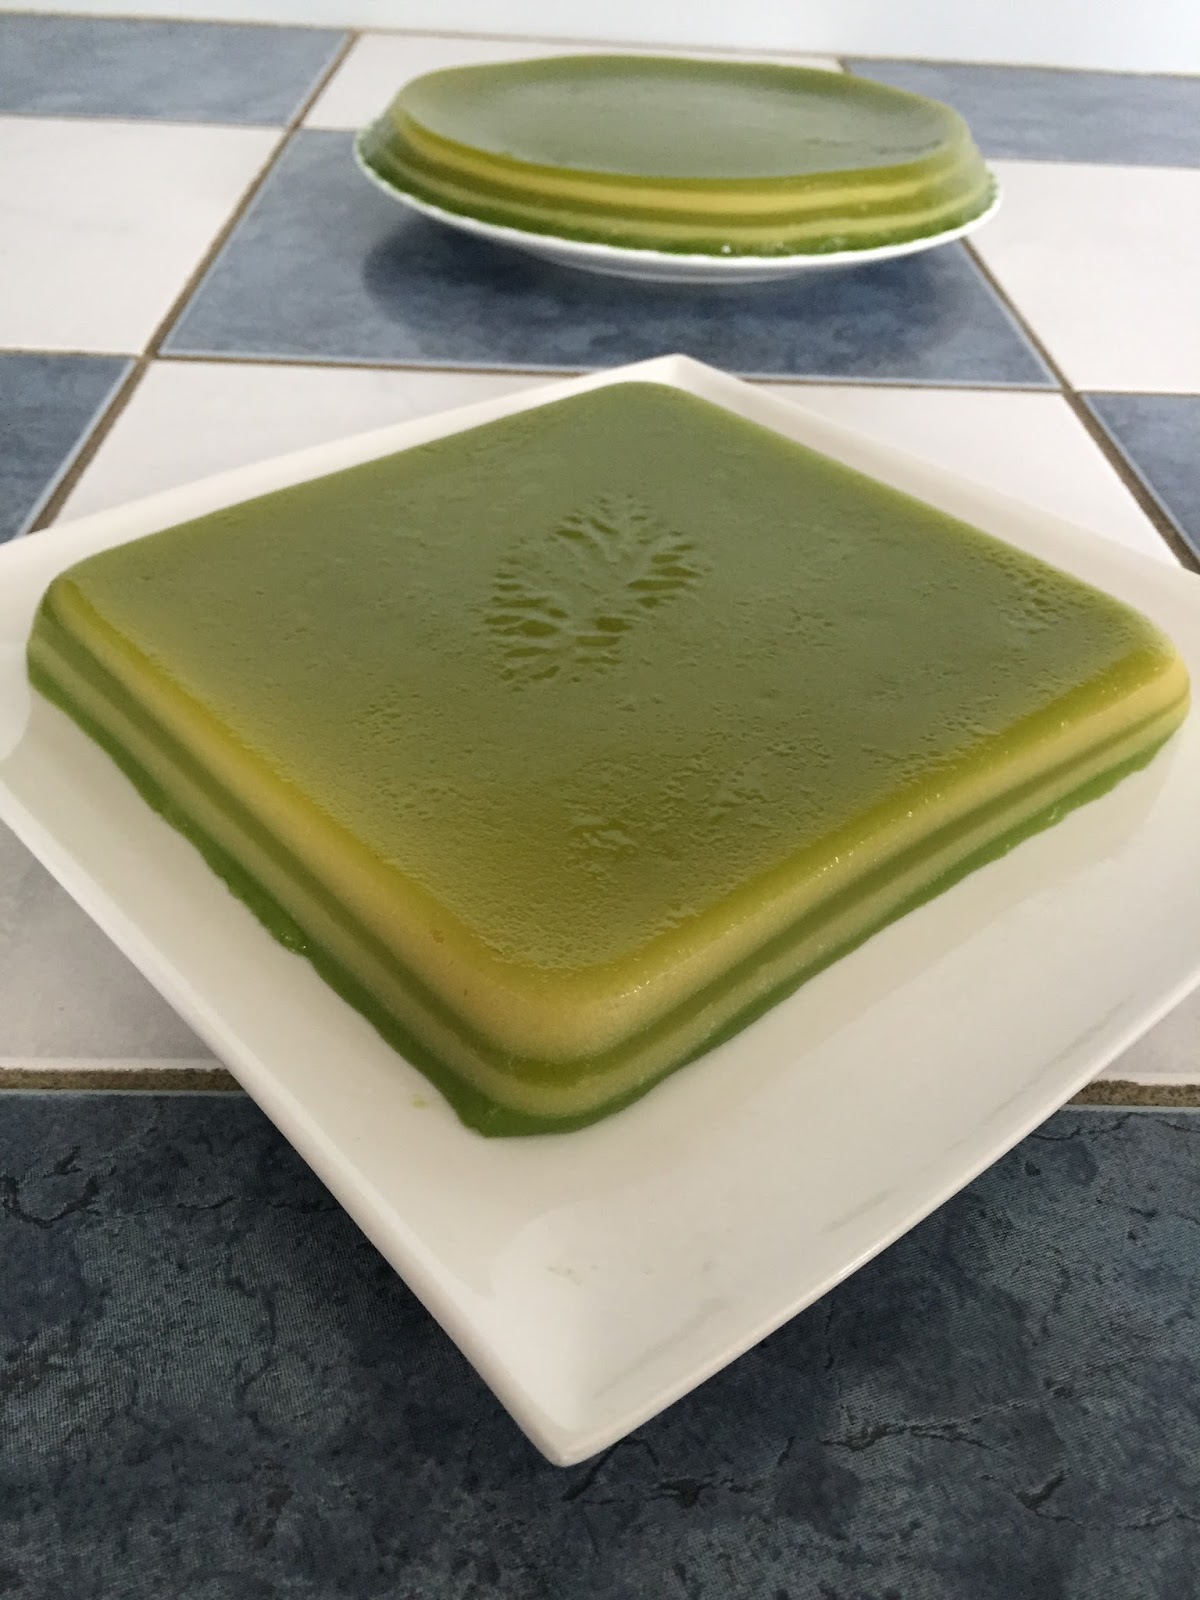
How To: Bánh Da Lợn (Vietnamese Steamed Layer Pandan/ Mung Bean Cake)

Hi Nibblers!

        Happy New Year Nibblers! I'm a little late on the celebratory new year post but I've just been out and about. There have been many recipes that I've written to do in 2015 that have yet to be made and my mind is racing with new innovative recipes for 2016. As per my resolutions for 2015, I do strive to continue on with pushing out recipes in 2016. Going back to recipes inspired from my own Vietnamese background and also exploring new avenues in the foodie world will be the key themes I hope to achieve this year. In addition to this, I hope to build more on Nibble Nation and improve my style, photography and taking on new creative routes.
         Bánh da lợn is one of my all time favourite Vietnamese desserts. My Mum used to make it on a 
pretty frequent basis when I was younger but has since moved on to other food ventures. It was only a
few weeks ago that I was roaming the dessert section in my local Asian supermarket that I saw a whole 
tray of these bánh da lợn sitting there staring at me. It re-ignited something inside of me. I just had to have it. I asked Mum if we should just buy some to satisfy those cravings. But when Mum looked at the prices, she said we could make four large cakes with the cost so we set off to buy ingredients instead. So here we are, recipe time! And after the whole experience, I don't think I'll ever buy bánh da lợn in the shops again. So simple to make and delicious!

How To: Bánh Da Lợn (Vietnamese Steamed Layer Pandan/ Mung Bean Cake)


Makes approx. 4 x 20cm cakes
Steamed mung beans
What you'll need:
For pandan level -
- 400g sugar
- 500g tapioca starch
- 1L of water
- 400mL coconut milk
- Approx. 200g or 6-8 pandan leaves (found at most Asian stores)
       Can be replaced with 3 Tbs. pandan extract however flavour may not be as intense  
- 2 drops of pandan extract (mostly for colour purposes)
For mung bean level -
Pandan mixture - unmixed
- 375g mung beans (soaked for an hour then drained)
- 375 tapoca starch
- 1 tsp. vanilla extract
- 260g sugar
- 1050 mL of water

How To:
Mung Bean component
1. Place drained mung beans on a cloth in a steamer for approximately 15 minutes or until soft. Remove from cloth and set aside
2. Mix tapioca starch, sugar, vanilla extract and water in a mixing bowl and combine until you can no longer feel granules at the bottom of bowl then set aside
3. Pop steamed mung beans into blender in about four batches and blend until smooth - if your blender needs liquid to pulsate, use as much of the tapioca/sugar/water/vanilla mixture as needed
Mung Bean layer
4. Once all mung beans have been blitzed smoothly, combine all the water components and mung beans together until well combined then set aside
Pandan component
1. Blend pandan leaves with 200mL of water
Blitzed pandan juice
2. Place a cloth in a colander and on top of a measuring jug then pour blitz pandan leaves to drain.
3. Picking up just the cloth with pandan leaves squeeze as much excess water into measuring jug
4. Take note of the amount of mLs in measuring jug as this adds into the whole 1L water limit
5. Mix pandan extract, pandan juice, tapioca starch, sugar and coconut milk in a large mixing bowl
6. Measure remaining fluid to make 1L of water and pour into the rest of the ingredients then stir until well combined
Assemble! (Mung bean layer should also be sandwiched in between pandan layers)
1. Lightly spray 4 x 20cm cake tins with oil (If you don't have tins, you'll be able to reuse tins given the cakes have had time to cool before being flipped onto plate)
2. Bring water in your steamer pot boil then place cake tin in centre of steamer
3. Stir pandan layer then once ready, spoon in about 3/4 cup of the mixture into cake tin in the steamer - be careful as it can get very hot! - OR to make things easier, mix pandan layer then transfer 200-250mL into a measuring jug before pouring into cake tin - heaps keeps layers even
4. Pop lid onto steamer and leave for 3 minutes or until layer is just about cooked - mixture should not coat back of a spoon. If it does, leave for another 1 minute, you don't want it raw as layers will combine but not too cooked as layers will seperate
The set up!
5. Prepare mung bean layer much like pandan layer, stir, transfer 200mL-250mL of mixture into measuring jug then pour into tin ensuring all corners of tin are covered then cover with lid for 5 minutes - test layer by using the back of spoon method
6. Repeat steps 3-5 until cake tin is filled and always leave the last pandan layer in steamer for 5 minutes instead of the usual 3 as this acts as your base of cake
7. Continue with steps until all mixtures are used up!
8. Leave cakes to cool for about 10 minutes before pressing the sides to dislodge from cake tin. Once all sides have been dislodged, carefully flip cake onto plate before serving!
Just after steaming!

               I hope you enjoyed this recipe! It sounds a bit hectic with all the components involved but once you do the first cake, it's simple to get the hang of things. It's okay if it doesn't work out the first time, the layers on their own taste great! This recipe is so versatile in terms of cake sizes as you can use whatever tin you like, just adjust the amount of mung bean/ pandan mixture you add so that the layers are even. If you do have any leftover cake, simply pop into the freezer for several weeks then thaw when ready OR pop into the fridge to last for up to a week then re-heat in microwave for about 40 seconds before consumption. Make sure to leave a comment below if you try this out.

Nibble Away,

             Jo

Thursday, 19 November 2015

How To: Chocolate Banoffee Cake

Hi Nibblers!

    Inspiration for recipes come from all kinds of places. This one came as I was strolling through Coles and stumbled across Chocolate Banana Tim Tams.  I was sold! I was thinking of all sorts of chocolate and banana cupcake ideas until Mum asked me to whip up a cake for my Aunty's 60th birthday. My Aunty had come over from France to visit so it had to be a memorable cake. My Aunty is all about coffee so I decided to incorporate it into the cake and encase the cake in coffee buttercream. I love how this cake turned. Moist on the inside and the perfect balance between the chocolate, banana and coffee flavours. The crushed Tim Tams added a crunch creating more texture combinations with every bite. So if you want to know how to make this cake, keep reading!

How To: Chocolate Banoffee Cake
Makes a 3 tier 20cm round cake or 12 standard servings                                     Takes approx. 4-5 hours including cooling time


What you'll need:
Sponge Component:
- 700g riped bananas (roughly mashed) - about 6 small sized bananas
- 80g or 1/2 cup cocoa
- 130g or 1/2 heaped cup brown sugar
- 4 eggs
- 1 1/2 tsp. vanilla extract
- 100g softened butter (room temperature)
- 4 tsp. baking powder
- 200g self raising flour
- 160g all purpose flour
- 50mL milk
- 4 roughly crushed Chocolate and Banana Tim Tams biscuits
Coffee Buttercream:
- 1kg of softened butter (room temperature)
- 450g icing sugar
- 2 tsp. vanilla extract
- 5 tsp. instant coffee mixed with 1 Tbs. water
Chocolate Ganache:
- 1/4 cup dark chocolate buttons
- 1/4 full thickened cream
Decorations: *Optional
- 5 Chocolate and Banana Tim Tam Biscuits roughly chopped into different sizes

How To:
Sponge Component:
1. Pre-heat oven to fan forced 160 degrees Celcius or 320 degrees Farenheit
2. Line 3 x 20cm round cake tins with baking paper or lightly spray to prevent cake sponge from sticking to edges
3. Evenly sprinkle crushed Tim Tams into 2 cake tins leaving one tin bare (that will be out top layer of the cake)
4. Beat softened butter and sugar together until light and fluffy (about 2 minutes)
5. Add eggs one at a time and beat until well combined
6. Combine self-raising flour, baking powder, cocoa and all purpose flour together then add half the contents to bowl
7. Combine mashed bananas, milk and vanilla extract together then add half of the contents to mixing bowl and beat until well combined
8. Add the reaming halves of the dry and wet ingredients and beat for a further 3-4 minutes until well incorporated
8. Pop cake tins into the oven for approximately 30 - 35 minutes. Swap the cake half way through to ensure all layers are cooked evenly. Once time is out, check with a skewer ensuring it comes out clean then pop aside until completely cool
        Note: If you wanted to save time, pop cakes into the freezer for an hour before doing anything further. It will help to level the cake later on as well!
Coffee Buttercream:
1. Beat softened butter until it turns into an off-white colour from the bright yellow tinge (Takes at least 5 minutes on high)
2. Add vanilla extract then beat until well combined
3. Add icing sugar and beat until well combined (at least 3 minutes on high)
4. Add coffee mixture to mixture and beat on high until well combined (at least 3 minutes on high) then set aside until needed
      Note: If you like a thicker buttercream, simply add a Tbs. of icing sugar each time until desired texture.
                 For a thinner buttercream, add a Tbs. of milk to the buttercream
Chocolate Ganache:
About 15 minutes before assembling your cake, make the chocolate ganache either over a double boiler or in a microwave.
I used the microwave method and here's how I did it
1. Place chocolate buttons (or crushed dark chocolate) with cream in a microwave safe bowl
2. Microwave chocolate/ cream mixture for 45 seconds
3. Take mixture out and stir as much as you can. If the mixture is still not smooth and silky, place in microwave for 20 second intervals until ganache is silky smooth with no lumps.
4. Set aside until needed - Ganache will thicken as it cools to room temperature

It's time to assemble!
1. Take cake sponges and level off each layer until all are as close to one another as possible. Pop the leftover cake to nibble on with your coffee - don't chuck it out OR make some cake pops
2. Spread an even layer of buttercream onto base layer of cake then place second layer directly on top then repeat process until you get to the top layer
3. Apply a thin crumb coat layer around the whole cake then place cake in freezer or fridge for 10 minutes
        Note: to avoid dirtying your cake board/ plate, place strips of baking paper around the bottom edges of the cake to prevent from spills
4. Generously apply another layer of buttercream around the whole cake until smooth
        Note: Don't be afraid to pop the cake back into the freezer for 10 minutes at any time. It'll help you smooth out any imperfections you want to fix
Crumb Coat
5. Using a tablespoon, gently pour ganache along the edge to create the tear drop effect. Add more ganache and slightly push against the ganache if you want a thicker drop then simply fill in the middle with ganache
6. Decorate the outside of your cake as desired - I chose to place a ring of crushed Tim Tams on the baking paper ring around the bottom of the cake and used the baking paper to firmly press the crumbs to line the cake. Remove baking paper ring once done
I also sprinkled some across the top of the cake with larger chopped pieces
I also added dried banana chips and meringue (things I had lying around in my pantry) to the top to add some colour and dimension
Voila! Cake is ready to go!


          My Aunty and family enjoyed this cake throughly. I received really positive reviews in terms of visual and taste aspects which I'm extremely pleased about. Even Richard who is not a fan of sweets said I did a decent job! It can be quite a rich cake so play around with sugar levels and decorative pieces to counter that. If you do give this cake a go or even make a cupcake version do make sure to leave a comment down below. Until then,

Nibble Away,

            Jo

Sunday, 25 October 2015

How To: Chocolate Orange Oreo Cupcakes

Hi Nibblers!

        I was flipping through the supermarket catalogues looking for a bargain when I stumbled across Oreo Orange Scream biscuits - a Halloween special. Recipe ideas came rushing through me and I thought I would do what I do best, cupcakes. These cupcakes turned out amazing. It had the perfect balance between chocolate and orange flavours at the base then paired with an Oreo orange buttercream gave the cherry on top. I love the look of these cupcakes and so happy with how they turned out. They tasted exactly how I had planned. It's a shame the Oreo Orange Scream are only around during Halloween (as far as I know) because these cupcakes would work all year around for those citrus lovers. Definitely a recipe to impress. So, if you're interested, keep reading on!


How To: Chocolate Orange Oreo Cupcakes
Yields approximately 12-16 cupcakes                       Takes approx. 1 hour including cooling process


What you'll need:
For cupcake base:
- 1 cup or 180g self-raising flour 
- 2 tsp. of baking powder
- 1/2 cup or 80g of cocoa powder
- 50g butter (softened to room temperature)
- 3/4 cup or 150g of sugar
- 2 eggs
- 50ml of milk
- 3/4 tsp. Vanilla Essence

- 1 large orange - blitzed (skinned and pitted - try to remove as much of the white skin as possible otherwise your cupcakes may taste bitter) - keep 1/4 cup of orange juices aside for buttercream
- 1 Tbs. orange zest (finely chopped)
For Orange Oreo Buttercream:

- 250g unsalted butter softened
- 3 Tbs. of icing sugar
- 1 tsp. vanilla essence
- 150g roughly crushed Oreo Orange Scream Biscuits - plus an extra 80g for cupcake toppers (optional)
- 1/4 cup of orange juice (set aside earlier on)
- 1 tsp. orange zest (finely chopped)
- 2 drops of orange food colouring or 2 drops of red and yellow food colouring each to form orange

How To:
Bake me!
Cupcake Component:
1. Pre-heat oven to 180 degrees Celcius or 350 degrees Fahrenheit
2. Line tin with cupcake paper
3. Beat  softened butter, vanilla essence and white sugar using hand mixer in a large mixing bowl until well combined and fluffy (approx. 3 minutes)
4. Add eggs in one at a time until mixed
5. Add flour and baking powder into the butter/sugar mixture and mix until well combined
6. Add milk, orange zest  and orange juice into the mix until well incorporated.
7. Spoon cupcake mixture evenly, filling it 1/2 of the way up the cupcake liners
8. Pop into the oven for 16 minutes checking with a skewer at the end to see if it's cooked
9. Rest the cakes for at least 15 minutes before decorating
Orange Oreo Buttercream:
1. Beat butter until it changes from a yellow to off-white colour - approximately 7 minutes
Ready to decorate!
2. Add icing sugar continuously mixing until well combined
3. Add vanilla essence, orange juice, crushed Oreos and orange zest until well combined
4. Add orange food colouring until desired shade then it's time to decorate!
                 Note: If you have leftover buttercream frosting, don't worry! You can pop it into the fridge for 3-5 days in an airtight container or up to 3 months in the freezer.


   Nom Nom! I hope you all enjoyed this recipe and re-create it for yourselves before the Orange Oreos go walking out of supermarket doors! Do let me know how they turned out and leave a comment below if you do. Hope you all have a spook-tacular Halloween!

Nibble Away,
              Jo

Sunday, 18 October 2015

How To: Panda Cake - Maple Syrup Cake with Coffee Buttercream Icing

Hi Nibblers!

          Panda cake coming your way this week. My inspiration for this cake came from my brother, Richard who recently celebrated his 26th birthday. He's a lover of pandas and even has a painting to cement those feelings. I had so much fun making this cake. I thoroughly enjoyed seeing a Panda face come to life. The only problem I had with it was I totally forgot the fact that once I popped coffee into the buttercream, I ruined the white Panda fur. So, if you're attempting this at home and want to make sure that your cake is a more accurate interpretation on a Panda just omit the coffee flavouring until you're ready to decorate the ears / eyes / nose etc.

How To: Panda Cake - Maple Syrup Cake with Coffee Buttercream Icing


What you'll need:
Makes 3 x 20cm round layers - Takes approx. 4 hours including cooling time
Maple Cake component:
- 250g unsalted butter (softened)
- 250g brown sugar
- 300g self raising flour
- 150g self-raising flour
- 2 tsp. cinnamon
- 250mL milk
- 4 eggs
- 2 tsp. vanilla essence
- 2 Tbs. of maple syrup - extra for decorating
Maple Coffee Buttercream
- 420g of unsalted butter (softened)
- 150g icing sugar
- 5 tsp. instant coffee with 1Tbs. water
- 2 Tbs. maple syrup
- 3 drops of black food colouring

How To: 
Maple Syrup Cake
1. Pre-heat oven to 150 degrees Celcius or 300 degrees Farenheit (fan-forced - if possible)
2. Line round cake tins with baking paper
3. Beat butter and sugar until well combined
4. Add eggs, vanilla essence, cinnamon and maple syrup and continue mixing
5. Add flour and milk in 2-3 portions and beat until all incorporated
6. Spoon cake batter evenly into three cake tins - lightly tapping so that batter spreads to the edges
7. Pop into the oven and bake cakes for 25 minutes - testing cakes with a skewer to ensure it's cooked. It should come out clean at the end of the bake time. If not, leave in the oven for an extra 5 minutes
8. Leave cakes to cool for 5 minutes in tin then pop onto cooling rack
Note: If you're short on time, pop cake layers straight into the freezer to cool quicker before decorating - Needs at least 30 minutes

Maple Coffee Buttercream
1. Beat butter on high for approx. 10 minutes until butter turns from an egg yellow to an off white colour
2. Add icing sugar and beat until well combined
3. Add maple syrup and beat
Note: Stop now if you want your panda to have white fur. If that doesn't phase you, continue on with the steps
4. Add coffee / water mix and beat well then seperate one heaped cup of buttercream into another mixing bowl
5. Add black food colouring to separated buttercream component then set aside for decorating
Note: If you want your cream a deeper black, just keep adding food colouring a drip at a time until your desired shade

Now it's time to assemble!
Maple Syrup drizzle
1. Level two layers of the cake until they're almost identical then set aside
2. Cut two 9-10cm diameter circles from leftover 3rd baked cake layer - for the ears
3. From the two 9-10cm circles you just cut, slice the circles evenly to form semi circles then set aside
4. For the Panda's snout, cut a small circle with a diameter of 3 cm from leftover 3rd cake tier then set aside
Note: With the leftover cake scraps, they'll be perfect with a cup of tea OR crumbed and made into cake pops. Don't waste the edible bits!
5. Place first cake layer onto cake board / plate
6. Drizzle on a few swirls of maple syrup on top the the first layer then apply and even coating of maple coffee buttercream
7. Add 2nd cake layer directly on the first layer and repeat the drizzling of maple syrup and application on maple coffee buttercream
8. Apply the maple coffee buttercream around the whole cake covering the edges - no need to be perfect as you're trying to represent fur
9. Place the 3cm circle about 3cm south of centre of the cake then cover the snout in buttercream
10. Repeat the drizzle of maple syrup and application of buttercream to the semi circle pieces so that you have 2 ears that are also 2 tiered to match the cake
11. Place ears on a 45 degree angle on either side of the top of Panda's head then apply buttercream
12. Using an open star tip - or whatever you have at home to resemble fur like pattern - pipe black buttercream to cover both ears
13. Proceed to piping/drawing eye patches starting from the snout piece leaving an oval like shape in the middle for the panda's eyes
14. Continue onto drawing a triangle button nose on the snout and a smile as per my picture displayed
Richie with his cake :)
15. Smooth out eye patches and nose with toothpick or an end of a spoon to eliminate the harsh edges created from the piping tip
16. Enjoy!

         I definitely loved doing some arts and crafts with this cake! It's a dense type of cake but the maple coffee buttercream adds a creamy rich texture that seals the deal. If you do give this one a try, make sure to leave a comment down below! I can already see a panda cake tradition happening in the years to come so I guess stay tuned for Panda cake 2.0 one day. Hope you're all having a lovely week.


Nibble Away,
               Jo
Related Posts Plugin for WordPress, Blogger...