Tuesday, 2 September 2014

How To: Mancakes (Father's Day Special)

Hey Nibblers!

           Father's Day is just around the corner for those of us in the land down under (Sunday September 7th to be exact). My Dad is so hard to buy for. He spoils himself with things he wants so I never have the chance to swoop in. I've also reached the age where handmade 'I Love Dad' cards are never completed due to time constraints so instead, I've turned to homemade breakfast instead.
           Pancakes are one of my favourite breakfast treats. They're easy to make and so versatile because you can enjoy them sweet or savoury. My inspiration for my 'Mancakes' came from my lovely cousin, Kelly. Back when we were in London together, she made me pancakes with bacon bits and a fried egg in the middle. It was the perfect combination of flavours and textures. So, with her in mind, I created my own version that would guarantee Dad's approval.

How To: Mancakes


Made some Mancakes with a side of Pancakes
yields 6-8 mancakes depending on the size of your frypan and preference Mancake size
What you'll need:
Cake batter:
- 1 cup or 150g of plain flour
- 1 cup or 250mL of milk
- 1 tsp. baking powder
- 1 tsp. vanilla essence
- 1 Tbs. lemon juice
- 1 Tbs. sugar
- 1 egg
- 25g melted butter
Man batter:
- 200g of minced beef (or whatever you prefer)
- 100g of diced bacon (optional)
- 1/2 tsp. salt
- 1 Tbs. mixed herbs
- 1/2 tsp. cayenne pepper (optional - for spice)

How To: Mancakes
Pancakes cooking away
1. Mix 'Man batter' i.e. minced beef, salt, mixed herbs, bacon and cayenne pepper then set aside
2. Sift baking powder, flour and sugar into a bowl, make a well in the centre then set aside
3. Mix lemon juice, milk, egg, melted butter and vanilla essence until well incorporated
4. Add wet mixture into the well of the dry ingredients bowl and stir until it becomes a runny paste with no lumps then set aside in a jug
5. Heat frypan to medium heat then fry off 'Man batter' mixture by constantly coating to ensure the minced beef breaks apart into small clusters then leave to cool for 10 minutes
6. Add cooked 'Man batter' into 'Cake batter' and stir
7. Re-heat saucepan to low to medium heat and pour Mancake batter into the centre
             Note: if you wanted to be more fancy, crack an egg into the frypan first before adding batter to make a complete breakfast. Just be wary that flipping the pancake is more challenging due to its weight. End process will taste great but it might not look as pretty and circular. It's the thought that counts though, right?
8. Cook one side for about 2 minutes or until golden brown before flipping to the other side and repeating the cooking process
9. Repeat steps 7 and 8 until you've finished the batter
10. Enjoy!


Ultimate Mancake. I forgot to take a picture of the end result
due to the state it was in. But man, was it delicious!
      I love how simple these were to make and took about half an hour all up. They tasted great and it's a nice twist on the classic pancake. If the 'Mancake' isn't your type of thing, simply ignore the 'Man batter' component and enjoy the pancakes on their own. It's quick and they tasted deliciously fluffy. You will definitely be in Dad's good books for the day.
     Hope you enjoyed this post and let me know in the comments below if you've given this a try!

Mancakes with maple syrup because why not? 
Happy (early) Father's Day to those Dads out there,
Nibble Away,

             Jo.

Saturday, 30 August 2014

Travel Nibbles: 'Ha Oanh' Review

Hi Nibblers!

        The travel nibbles are back and this time, I'm posting about Vietnam.
        It's been a while since I've visited Vietnam. A lot has changed in the five years. There's more commercial chain stores around the world popping up in Saigon that, it's difficult to find an authentic food stall. Don't get me wrong, there's still plenty great street food stalls around on the sidewalks to eat. However, due to my poor immune system I've signed a food poisoning sentence that has me limited in my choices.
         I walked into 'Cho Ben Thanh,' Saigon's most famous market with a mission. I knew cooked foods were more unlikely to set me up. I had an extreme craving for Vietnamese clear dumplings with prawns and pork (Banh Bot Loc) drizzled with fish sauce. It is available in Sydney but, difficult to access and can be quite expensive unless you order in bulk / time consuming to make. There were several stores that sold them in the markets but, they sold other different Vietnamese dishes as well which meant that the food may not be as fresh. As Mum and I were circling the food stalls, we found a place called 'Ha Oanh' that served dishes of Banh Bot Loc and Banh Beo (steamed rice flour cakes). There were not only tourists eating but also locals so it was a sign that we had to try this out.

'Ha Oanh'
Where: Cho Ben Thanh, 'Food Court' right near Gate 7 


         If we didn't see people eating at 'Ha Oanh' it would be extremely easy to miss as theres no large sign displaying its name. I can't give direct locations of the stall as Cho Ben Thanh is quite large but if you head over to were theres a 'food court' / food stall type of area, it should be where you can see Gate 7 sign.
         Service was quick and you can either take away or have there. Mum and I had our plates there as there was available seating. The rice flour cakes and clear dumplings were made in front of us so it was nice to see how things were made and their efficient system.

Open Kitchen
       

Small signage of store name 'Ha Oanh' drink prices


             Mum and I ate their standard mixed plate that consisted of Banh Bot Loc and Banh Beo together sprinkled with fried breadcrumbs and fish sauce. Each plate was priced at 17,000 VND which is approx. ($0.85 AUD as of July/August 2014) which is a total bargain! Add in fresh coconut juice for 20,000 VND ($1 AUD) and there's lunch done for less than $2 AUD.
            Mum makes Banh Beo at home so if she says these steamed rice cakes were good, it means they're good. They were small in size but had great chewy texture and mixed in with the slightly sweet, salty fish sauce it was an explosion in my mouth. Add the chives oil, a few slices of salty Vietnamese pork loaf (Cha Lua) and breadcrumbs, it had every element you could ask for.

Banh Bot Loc and Banh Beo drenched in fish sauce with Cha Lua and fried breadcrumbs. 17,000 VND
         The Banh Bot Loc was small but the overall portions of the plates was good for Vietnamese usual standards. There wasn't any prawns in the dumplings and the meat inside was more the fat layer of the pork rather than the meat, it was still satisfying. Having a combined plate of Banh Bot Loc and Banh Beo added different dimensions to the plate. While the Banh Beo rice cake was a softer texture, the Banh Bot Loc batter was more dense and the flavour was enhanced by the braised meat inside.
         I loved everything about this place and didn't suffer hours after. It may be difficult to eat if you haven't had anything like this before. The flavours of the fish sauce are intense and slightly spicy so beware if your spice tolerance is low. Give it a try / share a plate with a friend if you're unsure. I can guarantee you'll be wanting more. But if you're wanting authentic Vietnamese Banh Bot Loc and Banh Beo in Saigon, this is the place to go. Definitely found a hidden gem here.
         If you ever find yourself in Vietnam and give this a go, let me know in the comments below! OR what's your hidden gem place?

Nibble Away,
            Jo
P.s. Mum and I went back for seconds #sorrynotsorry

Sunday, 24 August 2014

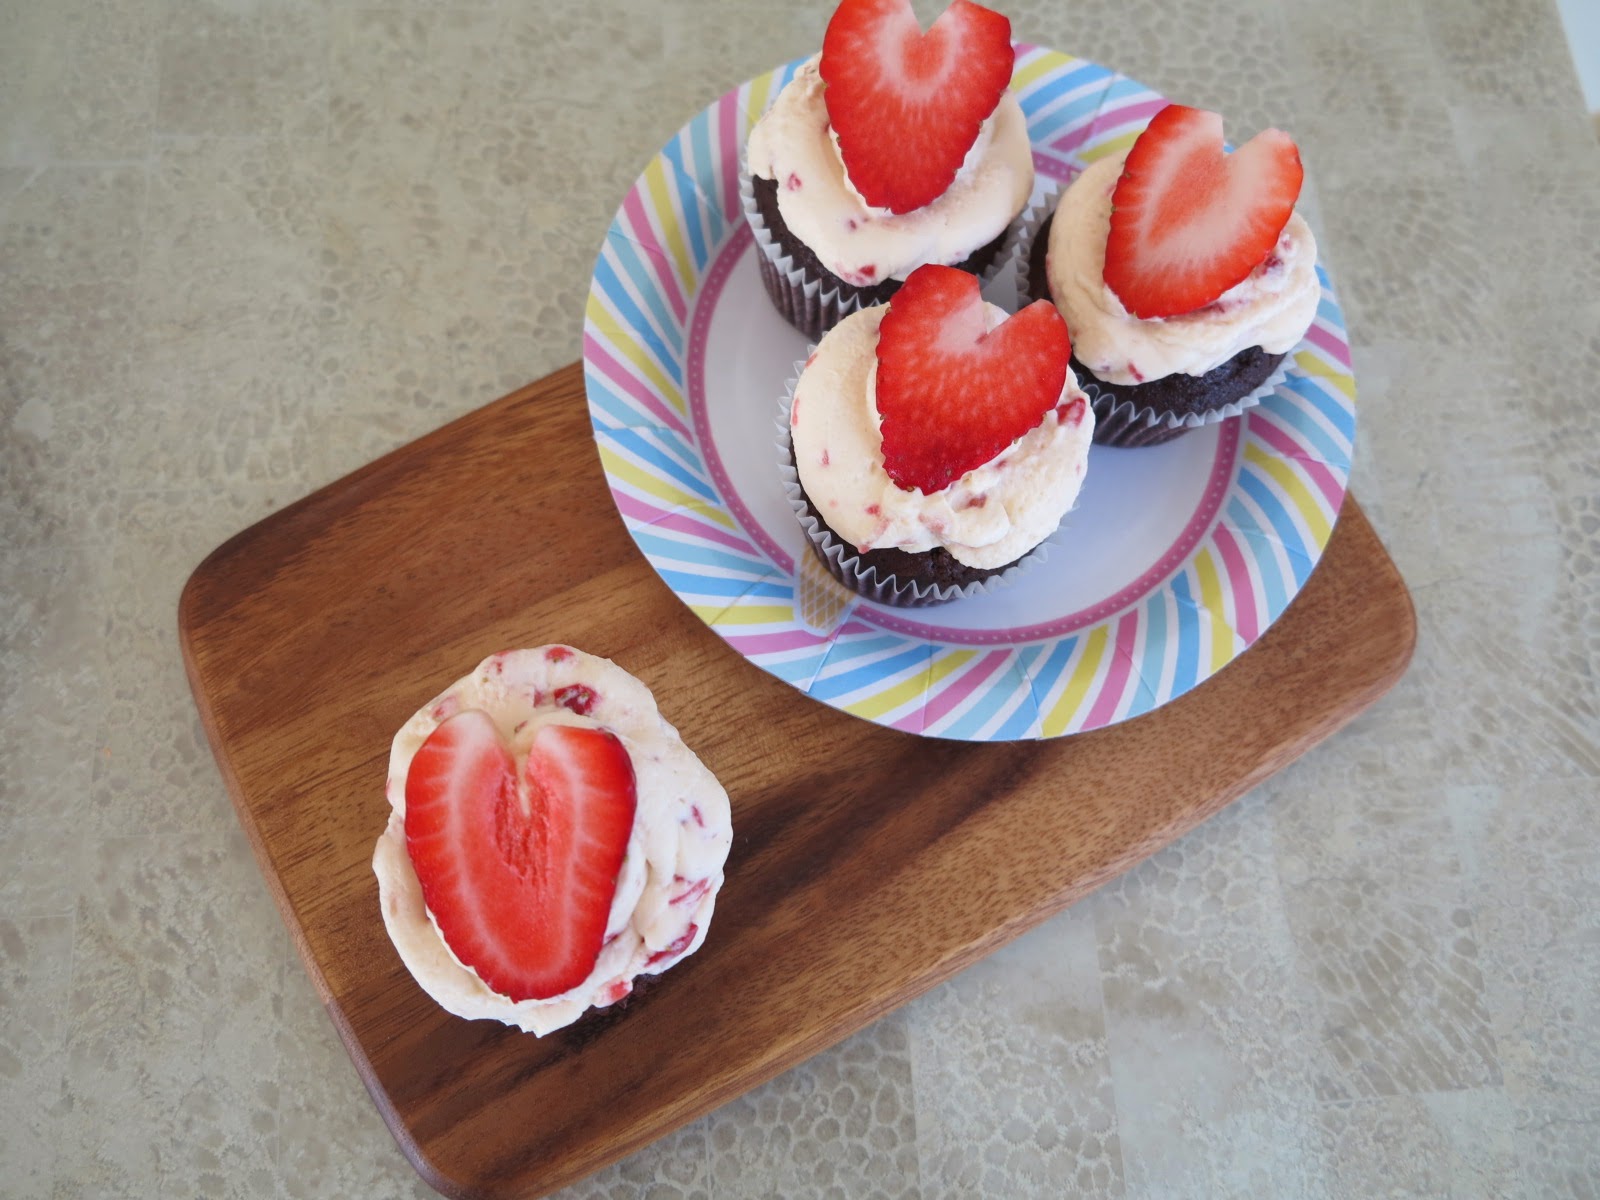
How To: Strawberries and Cream Cupcakes

Hi Nibblers!

         Spring is only a week away for those of us in the southern hemisphere. To welcome the months of hay fever, flowers and sunshine I decided to whip up a batch of 'Strawberries and Cream' cupcakes! These cupcakes are extremely easy to make and will not only look great on a plate, each one cupcakes comes with a special surprise. To top that all off, strawberries are selling at great prices in Sydney right now which makes it the perfect time to test these babies out.

How to: Strawberries & Cream Cupcakes


Yields 12-14 medium cupcakes

What you'll need:
Cupcake component
- 1 cup or 180g self-raising flour (plain flour will work just
remember to add a pinch of salt)
- 2 tsp. of baking powder
- 1/2 cup or 80g of cocoa powder
- 50g butter (softened to room temperature)
- 3/4 cup or 150g of sugar
- 2 eggs
- 1 cup or 250ml of milk
- 3/4 tsp. Vanilla Essence
- 12 Lindt strawberries and cream truffle balls
- 6 strawberries roughly sliced

Strawberry cream frosting component
- 4-5 strawberries roughly diced
- 300ml of thickened cream (or whipping cream)
- 3 Tbs. of sugar
- 1 tsp. of vanilla essence

How To: Cupcake
1. Pre-heat oven to 180 degrees Celcius
2. Line tin with cupcake patty pans
3. Sift together flour, baking powder and cocoa in a medium mixing bowl then set aside
4. Beat together the softened butter, vanilla essence and white sugar in a large mixing bowl until well combined and fluffy (approx. 3 minutes)
5. Add eggs in one at a time and mix 
Strawberry & Chocolate batter
6. Add 1/2 of the dry ingredients and 1/2 of the milk into the butter/sugar mixture and mix
7. Repeat step 6 until all ingredients are all combined
8. Add sliced strawberries and gently mix until well incorporated
9. Spoon about 2 Tbs. of the cupcake mixture evenly into each of the lined patty pans
10. Add  Lindt truffle into the centre of each patty pan
11. Add a further 2-3 Tbs. of batter into patty pans or until it fills up to the 3/4 mark
12. Pop into the oven for 18 minutes checking with a skewer at the end to see if it's cooked
13. Rest the cupcakes for 15-20 minutes

How To: Strawberry cream frosting
1. Pre-chill your mixing bowl and cream in the fridge to minimise the chance of your cream splitting
2. Beat cream, sugar and vanilla essence until soft peaks form (about 4 minutes using a hand/ stand mixer)
3. Add diced strawberries and continue mixing until desired texture (about 2 minutes). I like the frosting to be quite stiff because it holds more shape when piped onto the cupcakes
4. Decorate your cupcakes

       I made the mistake of pushing my Lindt truffles to the bottom of the patty pan so most of the cupcakes didn't have the oozy effect when cross-sectioned. However, they tasted delightful and thoroughly enjoyed.

Don't push those truffles to the bottom!
Truffle sunk and burst itself at the bottom of the patty pan

Batman
     

       I would also love to thank Kevin for making my baking adventures much more enjoyable by spoiling me with Batman, my new KitchenAid stand mixer! I'm so excited to use it and can't wait to share more recipes with you.
     
        Hope you enjoyed this post and leave a comment if you gave this a try.


Nibble Away,
         
            Jo

Wednesday, 20 August 2014

'Hot Star' Review

Hey Nibblers!

         I have a confession to make. I am obsessed with fried chicken. So, when I heard of 'Hot Star' a Taiwanese-style fried chicken store taking Melbourne and Sydney by storm, I just had to give it a go. I didn't want to pig out all on my own so luckily for me, I was accompanied by another self-confessed fried chicken lover, my friend, Tree!

HOT STAR 
Where: 96 Liverpool St, Sydney, NSW 2000                Website: http://hotstarchicken.com.au/


        We both stood there in front of the 'Hot Star' shop pondering over what we would order. Our stomachs were grumbling, the cashier guy was waiting slightly awkwardly for us to make a move and other customers were fluttering by. In the end we decided on the 'Original' large fried chicken, a 'Spicy' large fried chicken and 'curly fries with spicy mayonnaise sauce'.
         When they said large, I thought they were exaggerating. Turns out those fried chicken pieces were big. Tree and I gave each other a 'oh crap, it's huge' look and chuckled over the fact we may have over ordered. That aside, the chicken was placed in a paper bag that was about half its size and popped into the 'Hot Star' plastic bag we were given after ordering. The chicken pieces were relatively reasonable in price at $7.90 AUD each considering its size. They do also offer meal deals that come with a drink and a choice of one of their sides. One small problem I found with the packaging is that it's not very public transport friendly. The smell was pungent and the heat that came off the bag was pretty intense. We couldn't wait to tuck in though. But before we could, we had to make a short trek to Hyde Park as there are no seating facilities. Those silly Ibises were circulating us but we made it the best makeshift picnic we could.

From left to right: 'Original,' ($7.90 AUD) 'Spicy' ($7.90 AUD) & 'Curly Fries with Spicy Mayo sauce' ($3.90 AUD)
          First up, the 'Original' piece. Evenly coated with their special Chinese five spice-like, tangy seasoning, first bite was pretty amazing. I loved how the chicken was moist, boneless and the crunchy texture was on point. It was a very unique taste and the eating experience was enhanced due to it being freshly fried.
Open kitchen view at Hot Star
         However, the 'Spicy' piece was a different story. It had the same seasoning as the original with a generous amount of a sweet paprika like seasoning. Tree and I have pretty good spice tolerance but, as soon as we bit into this one, I had to reach for my water. The spicy flavour was intense and overshadowed the sweet, tangy taste of the original. While it was still a moist and had a great crunchy texture, it was not a very enjoyable piece of chicken. It left me sweaty and the oil began to build at my throat.
         I've had a few curly fries in my time and Hot Star's didn't cut it for me. Crunchy in texture but was soaked in an oily flavour. The fries didn't taste like they had soft potato insides and lacked their special seasoning. It's only saviour was the spicy mayonnaise that accompanied it.
         As much as I want to rave on about how amazing my first 'Hot Star' experience was, I have to say I'm quite disappointed by the whole experience. Tree and I both tried our hardest to finish our chicken pieces but while the first bites were amazing, the lust soon ended. Unfortunately, we also suffered several hours later with food poisoning. We have since recovered. However, the smell of Hot Star's fried chicken that waffles whenever we walk past no longer leaves tongues wagging.
         Have you tried 'Hot Star' and loved your experience? Leave a comment below, I would love to hear what you think.

Hope you're all having an amazing week,
Nibble Away,
                       Jo.

        P.S. I would love to thank my friend Tree for going on food safaris with me and being such a trooper after this 'Hot Star' experience. If you would like to see more of her adventures, she makes great easy-to-follow recipes on her blog 'The Quiet Kitchen.' Go check it out!


Thursday, 12 June 2014

How To: Hot Cross Buns

Hey Nibblers!

          Winter is in full swing right now. I'm sitting cozied up against my blanket rocking those fluffy strawberry slippers of mine. I don't know if it's just me but when the temperature drops, I'm immediately in carbs mode. All I can think about is breads, pasta, muffins. Mix that in with exam study and my cravings skyrocket. So what better way to satisfy all those cravings then to bake my own 'Hot Cross Buns?'
           But wait, 'Hot Cross Buns' in June you ask? Aren't they an Easter thing? Oops, you caught me. I actually baked these during the Easter long weekend but with the second last semester of university, time has been flying by too quickly. So to make it up to you all for my lack of posts, I've decided to ditch the studying for a day and get into procrasti-blogging. Woo hoo!


What you'll need:
The Buns:
- 372mL of room temperature milk
            Heat your milk for 10 seconds or so if you can't wait.
- 2 tsp. of dried yeast
            I used the 'Lowan' Instant dried yeast
- 1/4 cup of sugar
            Caster would be easier to mix but whatever you have in your cupboards will work
- 50g of melted butter
- 1 egg
- 4 1/4 cup of twice sifted plain flour for the buns & 1/4 cup of twice sifted flour (for kneading purposes)
            I didn't have any 00 flour on hand however, sifting plain flour a few times worked just as well
- 2 tbs. cinnamon
           Mixed spices would have been perfect but I didn't have any on hand so cinnamon will do!
- 1 1/2 cups of dried fruits
- 2 Tbs. of apricot jam

Flour paste
- 1/4 cup water
- 1 Tbs of plain flour

How to:
Foamy after 15minutes
1. Add yeast to milk while giving it a quick stir then set aside for 15 minutes
            By the end of 15 minutes, the yeast should have activated. You should see a foamy like mixture
2. Add egg, sugar and melted butter to the yeast/milk mixture and stir until well combined. Set aside
3. Sift flour into a large bowl, add your dried fruits and cinnamon and mix well
4. Make a well in the centre of your flour/fruit mixture and add the yeast/milk/egg/butter/sugar and stir until flour has been coated evenly
5. Using flour set aside for kneading purposes, flour a clean bench and knead the dough for roughly 15 minutes until dough feels smooth and elasticated

6. Place the kneaded dough in a large mixing bowl and cling-film bowl twice to create an insulated environment for the dough. Leave dough in a warm area for two hours. I left mine in the microwave for two hours to let it rise to double its size.
7. Pre-heat oven to 180 degrees Celsius / 350 degrees Farenheit fan-forced once the dough has risen for 2 hours
8. Knead the dough for a further 5 minutes to start the activation of the yeast and gluten formation again
9. Mould your dough into any particular shape. I chose to make mine an Easter egg shape
10. Make cuts in the dough (careful not to cut all the way through as it will separate the segments) to form the proportions of a bun
11. Mix flour and water together to form a paste and roughly pipe crosses across your dough
12. Bake your buns in the oven for approximately 20-25minutes or until golden brown
13. Brush a thin layer of jam onto the fresh out-of-the-oven buns and leave to cool
14. Nibble away with some butter, tea and more jam!


Easter Egg Shaped

Flour pasted!
Fresh out of the oven
            I'm really happy with the way these Hot Cross Buns looked! It's my first time baking bread/buns and I think it was a great success. They tasted amazing and go so well with a touch of butter.
             The texture wasn't as soft as I wanted to be. However, after reading a few articles and asking around, I think my faults were in my kneading technique and kneading time. I probably stopped for a few minutes to look at the clock as I was kneading. It's a workout but trust me, it's all worth that hard effort. My friend Tree (who has started her own amazing food blog 'The Quiet Kitchen') is an avid bread maker and suggested I put a bowl of water under my loaf of bread while its in the oven. It allows for the steam of the water to work its magic and soften the buns. So I'll definitely give that one a go, next time OR if you find yourself procrasti-baking, why not let me know how you got on by leaving a comment below.

Hope you're all well and having a fantastic week,

Nibble Away,

                Jo.
   

Sunday, 13 April 2014

How to: Chocolate Roll Cake with Coffee Buttercream Filling

Hey Nibblers!

     I've always loved a good roll cake. I always thought they were difficult to make and were way beyond my baking capabilities. But, when a birthday comes along (My Dad's, - Happy Birthday Dad!) I force to challenge myself to step out of my cupcake comfort zone and enter the world of gigantic cakes. And, with no further adieu Nibblers,  I can tell you my attempt was a huge success! Hooray!
    Better yet, this recipe is super quick (if you're on point with your prep work) and easy. It is sure to woo the crowds and have everyone thinking you're a baking goddess. Here's how:


What you'll need:
Chocolate  Roll:
- 75g / 1/2 cup of self-raising flour
- 6 eggs (yolk and whites separated)
- 35g / 1/4 cup of cocoa
- 1 Tbs. milk
- 2 tsp. vanilla essence
- 3/4 tsp. baking powder
- 1/2 cup white sugar

Coffee Buttercream:
- 250g of unsalted butter (softened to room temp.)
- 100g icing sugar (sifted)
- 1 Tbs. milk
- 2 Tbs. hot water
- 2 1/2 tsp. of ground coffee (instant or freshly blended - whatever you have)
- 1 tsp. vanilla essence

How To:
Chocolate Roll:
1. Pre-heat oven to fan forced 180 degrees Celsius
2. Line and light grease a 30 x 40cm rectangular baking tray with some baking / parchment paper then set aside
3. Sift cocoa, baking powder and flour in a small bowl then set aside
4. Beat egg whites in a large mixing bowl until soft peaks form before adding sugar and continue beating until egg white mixture becomes glossy (approx. 3 minutes on high)
5. Beat egg yolks with milk and vanilla essence in a separate bowl
6. Fold yolk, milk, vanilla mixture into the egg white bowl

White/ yolk folding

7. Add dry mixture (flour, baking powder, cocoa) to the mixed yolk/whites bowl and fold until well combined
Cocoa/ white and yolk folding
8. Pour mixture into lined baking tray and spread evenly to all corners. Wiggle the tray lightly to ensure an even spread. Make sure not to tap the tray as you'll break the air bubbles in the egg whites which may affect the rise of the cake
9. Pop into the oven for 13 minutes
10. Sift a small amount of cocoa onto a new piece of baking paper to act as a working space for the cooked chocolate sponge
11. Flip the cooked sponge onto the new cocoa coated baking paper then carefully remove the baking paper that was used to bake the sponge in the oven
12. Using the baking paper, fold the shortest edge of the sponge and roll (yup, while it's hot / warm) and leave it in the rolled cylinder to cool completely

Kebab anyone?

Coffee Buttercream:
1. Mix coffee mix into hot/warm water until dissolved and leave until completely cooled
2. Beat softened butter on high for 5-7 minutes until the yellow butter turns to a creamy - off white colour
3. Add and mix milk and vanilla essence until well combined
4. Add sifted icing sugar and beat for 5 minutes until well incorporated, remembering to scrape the sides
5. Add coffee mixture into the buttercream and mix well
      Note: - If you find your mixture too runny, add 2x Tbs. icing sugar until you have the perfect
                   consistency
                - If you find it too stiff, add a Tbs. of milk until you have the perfect consistency
                            - Perfect - pipeable consistency is when it'll only slide of your spatula if you force it
                              back into the bowl with one swift hand movement

Assemble:
1. Un-roll your sponge
Look at those fold marks!

2. Using a piping bag, fill the inner rectangle sponge with the coffee cream

I accidentally added a bit too much cream. But it's so good, I didn't even care. You'll probably use abut 3/4 of the coffee buttercream you produce. Pop the leftovers in the fridge or freezer in a air-tight container for 2-3 weeks.
3. Spread the cream evenly, close to the edge as possible, to about a 5mm thickness


4. Using the baking paper, fold the shortest edge of the filled sponge and roll just as you had it before
5. Cut off the rough edges if you like then serve!

      I hope you enjoyed this recipe and be sure to share if you do give it a go. Dad loved his cake and asked for some slices to bring to work so he can have with his morning coffee. Coffee on coffee, why not? The beauty of this roll cake is that you can customise it to whatever flavour you want and will suit every occasion. Why not impress the family with an Easter themed roll cake? Add a couple of miniature easter eggs in the filling and they're all in for a surprise.

Here's a side view of my coffee buttercream covered two-tiered vanilla sponge cake I made last week for an early Easter party with the family. Coffee buttercream goes amazing with anything!

        Hope you're all having a lovely week!

        Nibble Away,
                 
                    Jo.

Wednesday, 26 March 2014

How To: Salted Caramel Sauce & Frosting

Hey Nibblers!

     Salted caramel, where have you been all my life? Salted caramel has been all the rage lately. Its ability to satisfy the sweet tooth but also deliver a salt kick performs well in anyone's book.  There has not been a day that I haven't spotted a salted caramel image. I call this fate. Fate that I must be one with salted caramel. That is why I decided to get off my bottom, head to the kitchen and make some love with caramel.

 
What you'll need: Yields about a cup (250mL) of salted caramel
- 100g sugar
- 90g of salted butter
- 1/2 cup of thickened cream (125mL)
- 3 tsp. of salt (Aim for the best available salt where available)

How To:
1. Heat sugar in a saucepan over medium heat, stirring constantly
2. Mix until the sugar melts into a brown- amber liquid and then immediately add butter then stir
3. Stir until butter is completely melted (Takes 2-4 minutes)
4. Pour thickened cream into the caramel, stirring continuously
5. Leave to boil for a minute
6. Remove from heat and sieve the caramel through a sift to ensure a smooth consistency
7. Add in salt
8. Allow caramel to cool before using

Salted Caramel in pictures

Sugar begins to melt, stir with spatula
Sugar after about a minute - melting
Sugar caramelising into perfect amber colour
Add butter and stir
Caramel bliss - remove from heat
Sieve caramel to ensure a smooth consistency then add salt

        FAQs:
        - Leave your caramel in an airtight container in the fridge for up to two weeks

        There you have it. Salted caramel in minutes! It's super easy and will be sure to impress anyone. I took it a step further and added it to my buttercream recipe (below) to make the most perfect salted caramel frosting.

Salted Caramel Frosting:
200g of softened unsalted butter
100g sifted icing sugar
2 Tbs. of milk
2 tsp. vanilla extract
1/4 cup of salted caramel sauce

1. Beat softened butter for 5 minutes or until butter turns from a bright yellow to a creamy colour
2. Add milk and vanilla and mix until combined
3. Add sifted icing sugar into buttercream
4. Mix for an extra 5 minutes to ensure all elements are incorporated
5. Add salted caramel sauce and mix just until you can't see caramel streaks

     FAQs:
   - For pipe-able buttercream, the mixture should slip off a spatula only upon the force of your hand
             Slides off spatula? It's too wet, add some sifted icing sugar
             Won't slide off spatula? It's too thick, add a Tbs. of milk at a time to hit the perfect consistency

Hope you enjoyed this recipe. Be sure to send through some pictures if you do give it a try.

Nibble Away,

      Jo
Related Posts Plugin for WordPress, Blogger...