Tuesday 28 January 2014

Travel Nibbles: 'MOS Burger' Review

Hey Nibblers!

        A little bit over a week ago, I was enjoying myself in sunny Gold Coast, Queensland. It was my first trip with friends and for Kevin, Conan, Lily, Jacky and Anderson, it was some of their first time in Surfers Paradise. We hired a 2 bedroom apartment at the 'Hilton' at a great rate and saved a lot on food costs for the week as we were able to cook all our meals.
       While Kevin and I were on a night stroll, we stumbled across 'MOS Burger.' This name sounded so familiar to the both of us and when we walked over to look at the menu, it hit us. About four months ago, I watched a video posted by American couple 'Kyde and Eric' on Youtube where they reviewed their 'MOS Burger' dinner experience in Japan where they are currently reside. While their review was mixed, the menu was too interesting to pass. Conan loves Japanese food/ flavours so when we saw 'MOS' Kevin and I decided to eat elsewhere so we could bring the rest of the gang for our last night in Surfers Paradise.
        'MOS Burger' started in 1972 with their objective 'to make people through food.' In terms of interior design, I loved the natural wood colour scheme they had. It just felt calming and the contrast of the green for their 'MOS Burger' sign tied in well. It's a pay before dining service so once all the ordering out of the way, it was smooth sailing from there. Here's what we had:
Interior of MOS
'MOS Burger'
                              Where: SHOP T1.05A, Soul Retail, 4 The Esplanade, Surfers Paradise, QLD 4217.          
               Website: http://www.mosburger.com.au/index.php?option=com_content&view=frontpage&Itemid=1

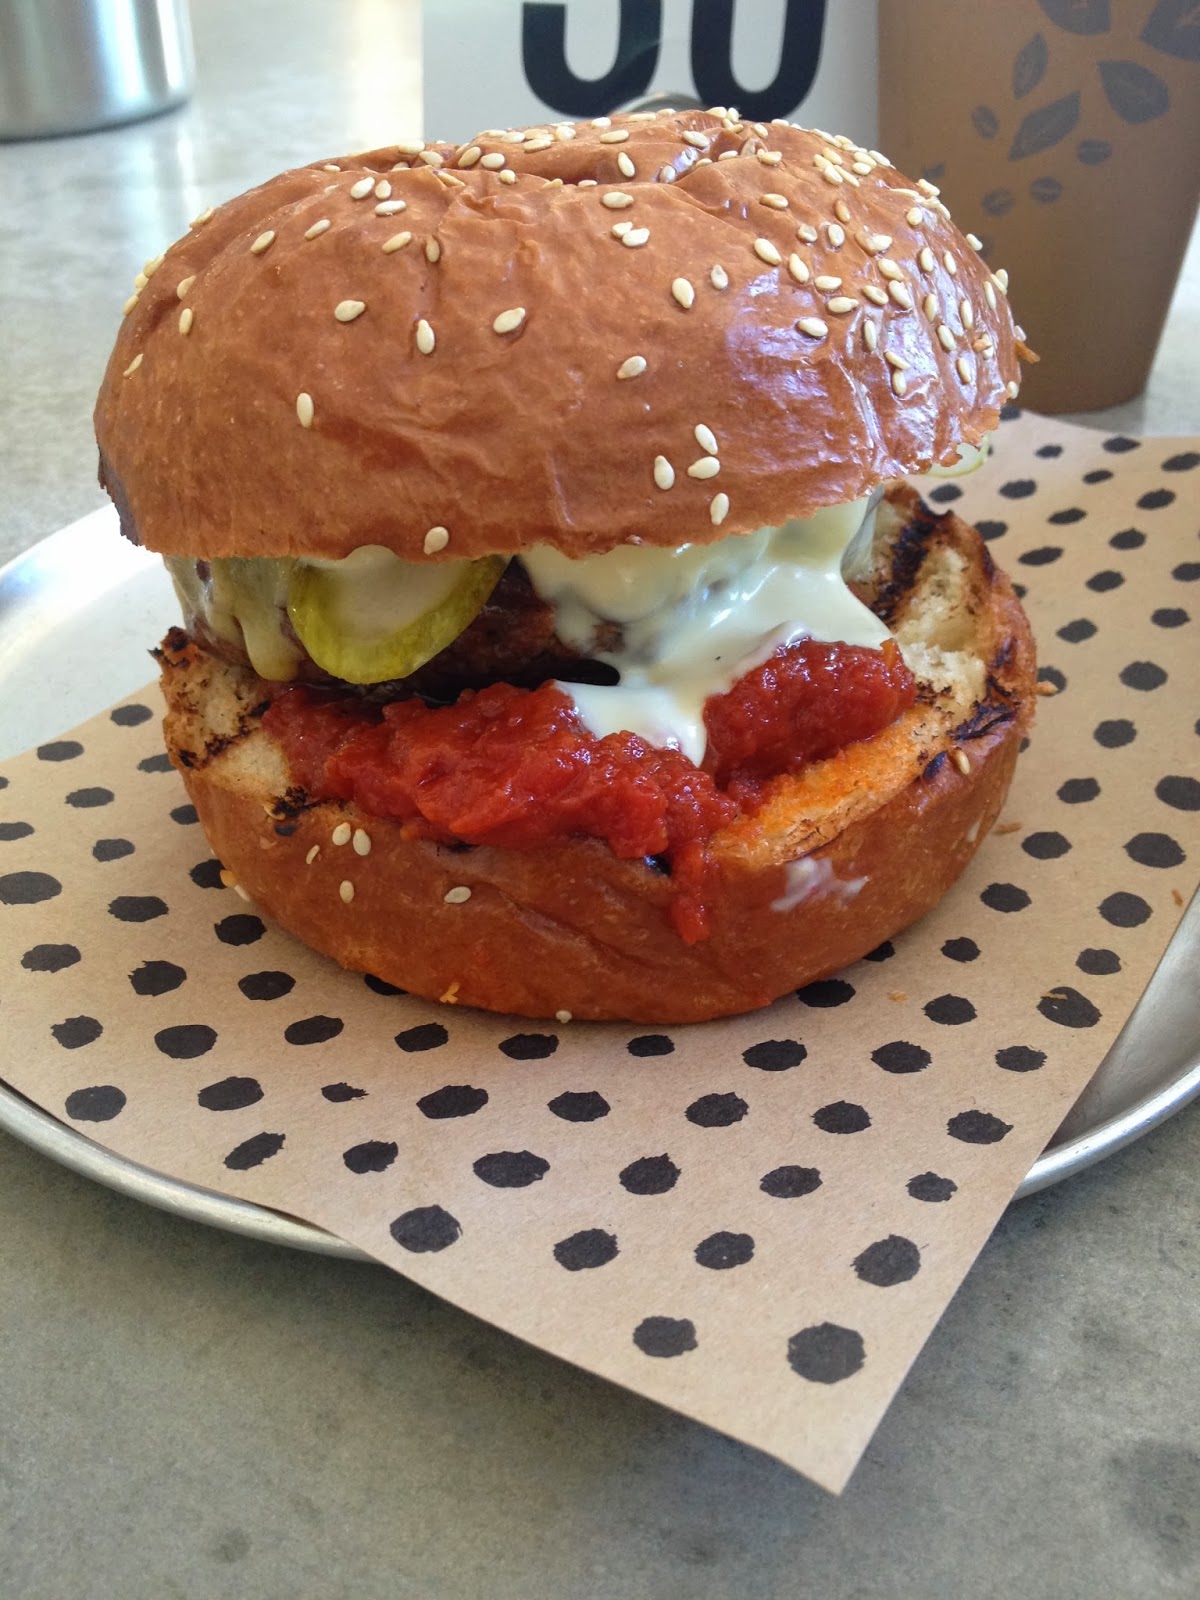
        I ordered the 'Seafood Okonomi Burger' ($5.95 AUD) which was a rice patty with dried seaweed and seafood Kakiage (Tempura/ deep friend Japanese batter).
       The concept of this burger was mouthwatering. However, if you get down to the the nitty gritty of things, the rice patty was soggy and the seafood Kakiage had great crunch but was too salty. I loved how all the burgers came in a wax-y white paper that made handling easier and mess - free (sort of). So, great concept, poor execution. 
        The 'Iced Matcha Latte' ($4.95 AUD) I ordered was amazing though. Not too sweet and a great partner with the meal. I never used to be a green tea fan but Gold Coast has converted me and now, I crave them. So, Win!
         Kevin ordered the 'Shrimp Cutlet Burger.' ($5.45 AUD) This burger had a burger bun, shrimp patty, shredded cabbage and Japanese Tartare sauce. This burger was definitely a winner. It tasted like shimp, it was full of flavour and very generous with the sauce. The slightly salty and tangy tartare sauce worked well together with the sweet buns. Really enjoyed this one.
Burgers in a Basket (Shrimp Cutlet & Wagyu Beef in frontal view)
         He also ordered the 'Fish Burger' ($4.95 AUD) as the Shrimp burger left him wanting to try more. And why not? 'MOS Burger' isn't around in Sydney, so may as well go for it all. This burger had a fish patty with cheese, onions, mustard and tartare sauce. While presentation was good, the burger was unfortunately disappointing. The fish patty was overcooked and therefore the texture was just flaky. Not a winner here unfortunately.
         Conan and Lily both ordered the 'Gourmet Wagyu Burger.' ($6.95 AUD) Filled with Teriyaki sauce, Wagyu patty, onion, a tad of wasabi, lettuce and sauces on a 'MOS' bun it looked pretty delicious. I didn't have a taste of their burgers but both enjoyed their burgers. The patty was moist, well seasoned and had a extra edge over other hamburgers.
          Jacky was feeling poorly so when he order the 'Teriyaki Chicken Burger,' ($6.45 AUD) he wasn't able to taste it. All I can say for this one was it was generous amount of chicken and sauce and he didn't say it was bad. He even finished it while feeling so ill so it may be a sign the burger could have been a major hit!
          Anderson ordered a 'Shrimp Cutlet Burger' which was identical in generosity of the burger fillings and taste to Kevin's. He also order the 'Spicy Chilli Dog.' ($5.45 AUD) He said the burger was quite hot so you have to be able to take chilli to enjoy. The bun was moist and hot dog inside was flavoursome. He said it was definitely something he would order again.
          To accompany their meals, they ordered 'Peach' and 'Lemon' iced teas. ($4.95 AUD each) These teas were made in store and tasted very fresh. They were a tad sweeter than what they would of liked but all enjoyed it as a treat instead.
Peach Iced Tea with my Iced Matcha Latte in the Background
          We decided not to buy any set meals as we didn't find any of 'MOS Burger' sides eye-catching. They offered garden salad and wedges but no one was keen on them. I felt it was a good decision in the end as the burger were deceptively sized. They looked small but by the end of the meal, I was well satisfied and had room for dessert if we did have some. Usually, dinner leaves me stuffed that I can never enjoy dessert.
           In terms of prices, the burgers on their own are a tad pricey. Ranging from $4.50 - $9 for a burger on it's own. While they are more than what you would pay at a fast-food joint, the ingredients used tasted more fresh and didn't leave you feeling sick at the end of the meal.
           All in all, I really enjoyed my experience at 'MOS Burgers.' They offered great burger varieties and the service was quick, clean and it had a really great atmosphere. I loved how our burgers came in a basket instead of a tray which takes away that 'fast-food' type of feel. I would definitely try it again if I ever saw a 'MOS Burger' around. Maybe opening up a Sydney store would be a good idea?
           I hope you enjoyed this review and if you Nibblers have tried 'MOS' anywhere in the world, leave a comment below. I would love to chat about our experiences.
         
           Until next time,
           Nibble Away,
                       Jo.
Here's a few snaps from our trip and our 'MOS Burger' experience.
MOS Burger Menu

MOS Burger Ordering Counter
Breakky with a view from our apartment. (I made poached eggs for the first time)
Our view from our apartment
Anderson, Conan, Kevin, Jacky, Lily and I @ Movie World! We also went to 'Sea World' and 'Wet n' Wild'

Monday 27 January 2014

How To: TARDIS Cake and Adipose Cupcakes!

Hey Nibblers!

        My friend, Thao is turning 21! Woo hoo! In celebration of this glorious event, she had a dinner party at 'Kansai' a Japanese restaurant on Hunter Street, Sydney a few days ago. I saw this as a perfect opportunity to challenge myself and make a cake. Thao is a MASSIVE fan of 'Doctor Who' so I thought I would surprise her by making a Tardis Cake and Adipose Cupcakes to go with it. Mind you, I have no idea what any of these characters are but, I chose the cutest/ easiest characters I could find. I have to start somewhere right?

        I decided to go with the same chocolate cupcake recipe I made earlier for Therese's Choco-Cat Cakes because I thought the 'TARDIS' blue frosting would be a better contrast on the chocolate sponge rather than a vanilla one. So, let's get started shall we? I'll copy the recipe from the other blog post to make it easier for you all to follow.


Chocolate Cake Component 
What you'll need: 
- 170g of plain flour
- pinch of salt
- 1/4 tsp. baking soda
- 2 tsp. baking powder
- 2 eggs
- 3/4 cup of cocoa 
- 50g unsalted butter (softened to room temperature)
- 1 cup of white sugar
- 1 cup of milk
- 3/4 tsp. Vanilla Essence
       (I doubled all components above to make one batch of cupcakes and the cake)

How To: FOR CAKE COMPONENT
1. Pre-heat oven to 160 degrees Celcius
           Note: For Adipose Cupcakes, preheat to 180
2. Line rectangular cake tin (27cm x 19cm / 11 x 7 inch) with baking paper
           Note: For Adipose Cupcakes, line cupcake tin with paper
3. Sift together flour, salt, baking soda, baking powder and cocoa in a medium mixing bowl
4. Beat together the softened butter, vanilla essence and white sugar using hand mixer in a large mixing bowl until well combined and fluffy (approx. 3 minutes)
5. Add eggs in one at a time until mixed
6. Add 1/3 of the dry ingredients into the butter/sugar mixture and hand mix until well combined
7. Add 1/3 of the milk and mix until well incorporated. Remember to scrape the sides of the bowl
8. Repeat steps 5 & 6 until all ingredients are all combined
9. Spoon cupcake mixture evenly and 3/4 of the way up 
10. Pop into the oven for 45 minutes checking with a skewer at the end to see if it's cooked
             Note: For Adipose Cupcakes, pop into the oven for 18 minutes, checking with a skewer
11. Rest the cakes for 20 minutes with 10 minutes in the freezer to prepare for the frosting construction
             Note: Let Adipose Cupcakes cool for 20 minutes before decorating (to ensure the butter cream frosting does not melt)

Peanut Butter Frosting:
What you'll need:
- 250g of unsalted butter (softened to room temperature)
- 200g of sifted icing sugar
- 3 tsp. Vanilla Essence
- 2 Tbs. of milk
- 2/3 cups of smooth peanut butter
- Red Food colouring
- Black Food Colouring
- Blue Food Colouring

How To:
1. Using a hand-mixer, beat the softened butter for 5 minutes.
           (The butter should change from a yellow to off-white colour)
2. Add 1/2 of the sifted icing sugar, continuously mixing until well combined
3. Add milk & Vanilla and mix 
4. Add remaining icing sugar and mix until well combined remembering to scrape the sides of the bowl. Mix for another 3 minutes
5. Mix in the peanut butter until well incorporated 
             The frosting should now be ready. It should stay on your spatula unless you force it down yourself.
                 Note:  If the frosting is too sloppy, add more icing sugar. If your frosting is too dense, add a Tbs. of milk.
                             If you have leftover buttercream frosting, don't worry! You can pop it into the fridge for 3-5 days in an                                  airtight container or up to 3 months in the freezer.
6. Divide frosting into 1/2 (light blue), and three 1/3 sections (dark blue, black & cream) from the remaining half
       For light blue frosting: Mix in 2 drops of blue food colouring and one of red
       For dark blue frosting: Mix 2 drops of blue food colouring, 1 of red and 1 of black
       For black frosting: Mix 5 drops of black food colouring
       Leave remaining frosting as is and set aside


TARDIS Construction:
I had to take the cake on the train so I couldn't construct it on a cake board. So instead, I bought a aluminium tray that comes with a lid for easy transportation and construction. I made slits in the corner so I wasn't restricted by the corners when frosting.
Firstly:
1. Cut 5cm from the top and 1cm from the bottom (I only did this because my cake would not fit in the tray I bought)

2. From the end pieces you just cut, chop vertically a 1/4 off and using the 2/4 left to form the layer before the TARDIS light bulb up the top
3. Secure the 3/4 chunk of cake using frosting as your glue (any colour will do)
4. From the 1/4 piece you cut, crumb the cake together to form a round edge cylinder shape for the light bulb
5. Secure that knob using frosting to the top
6. From your other unused pieces of cake, cut a thin rectangle piece (approx. 10cm x 1.5cm x 0.5cm) to act as an elevation for the 'Police Box' sign
7. Secure the piece with frosting about 1cm from the original top of the cake
8. Pop into the whole cake into the freezer for 5 minutes to allow things to set
9. Spread a thing layer of light blue frosting over the whole cake to set the crumbs in place and pop into the freezer for 5 minutes

10. Spread a generous light blue frosting layer (approx. 0.2cm thickness) all over the cake and pop into the freezer for 5-10 minutes

11. Using a knife, lightly outline where you want the frames to go so you have a rough guide of where to pipe (two columns of 4 frames going vertically underneath each other)
12. Using the the dark blue frosting, fill in the three right side frames from the bottom and two frames on the left from the bottom. Smooth it out with a knife to ensure there's no lumps. Set to freeze for 5-10 minutes
13. Pipe the uncoloured peanut butter frosting for the three remaining frames and the light bulb up top. Smoothing with a nice as you go. Set into the freezer for 5-10 minutes
14. Using the black frosting, colour the elevated 'Police Box' rectangle, outline the frames and draw a line in the middle of the cake from the 'Police Box' rectangle downwards to represent the TARDIS door. Pipe a small line on the right hand side half way down the cake to represent a door knob. Also pipe 2 vertical and 1 horizontal on the top two frames to act as a window and wiggly lines on the second frame on the left to represent words. Apply horizontal and vertical lines to the knob we made earlier at the top of the cake to make a lightbulb. Set in the freezer for 5-10minutes.


15. Using a very small piping bag hole, write the 'Police 'Public call' Box' in the elevated black rectangle area
16. Leave in the freezer to set for 5 minutes and consume!


Adipose Cupcake Construction:
What you'll need: For 6 Adipose Cupcakes
- 18 mini white marshmallows
- 12 marshmallows
- 1 Tbs. peanut butter frosting
- 1 tsp. black peanut frosting 
- 3 Tbs. light blue peanut frosting
- 3 Tbs. dark blue peanut frosting
           (You should have some left over from the cake)

How To:
Un-cut Marshmallow
1. Cut 1mm off the end of the normal sized marshmellows
2. Add frosting to the severed end to add as glue when sticking a second normal sized marshmellow together. This forms the Adipose body
3. Cut a mini marshmallow in half to form the arms for the Adipose
4. Secure the arms with small amount of frosting about half way down the Adipose body
5. Glue with frosting two mini marshmallows to the Adipose body directly underneath the arms to form their legs
6. Pipe two dots for the eyes and an arrow pointing down ways for the Adipose mouth to form their face
7. Repeat steps 1-6 until you make enough Adipose required
8. Pinch a small amount of cake from the top left hand corner to act as a seat for the Adispose
9. Pipe in a circular motion using the light blue frosting until the frosting covers the edge of the Adipose's seat
10. Pop the Adipose into the dent and leave it to rest
Dent for the Adipose
Frosting glue for the Adipose Body
11. Repeat steps 8-10 alternating with the dark blue frosting until you have your required number of cupcakes
Adipose!
Another TARDIS Angle
Happy Birthday Thao!
       Phew! That was a long post. It may seem really overwhelming just reading but I assure you this is super easy once you understand the basis of what you need to do. It's not as perfect as some of the amazing TARDIS cakes out there but, I'm really happy with how the cake turned out. My next step is to invest in some cake decorating tools because I did find it difficult smoothing out frosting with a butter knife. The cake turned out as moist as the cupcakes and was thoroughly enjoyed by everyone at dinner. 
     From this new culinary adventure I've just embarked on, I hope I've inspired some of you Nibblers to get out of your comfort zone and make a simple cake/ cupcake into an awesome one! If you do, don't hesitate to comment below, instagram me or even shoot over an email. Hope you're all having a lovely week. And to Thao, the person I dedicate this post to, I hope you have an amazing 21st birthday. x

Nibble Away,

               Jo.

Thursday 23 January 2014

'CHUR Burger' Review

Hey Nibblers!

     Catching up with friends over good food is one of my favourite things in the world. Faye and I make it our mission to try new things every time we hang out. I must confess, we haven't exactly been accomplishing our missions as of late. Instead of being adventurous, we've been staying put with the comfort of sushi. On our last two occassions, it's been sushi so when it came to our third meeting we decided to branch out. While I was weighing our options, I stumbled across 'Chur Burger.' At first, I was quite skeptical as after my last burger outing it left me unsatisfied. But as soon as I saw they offered a 'Salted Caramel' milkshake, I just had to give this place a go!

'CHUR Burger'
 Where: 48 Albion St, Surry Hills, NSW, 2010           Website: http://www.churburger.com.au/#menu


        It was busy when we walked in. I loved the tin barrels that were used as chairs that were surprisingly comfy to sit on and the quirky decor of the place. Tables were set up simply and had quick turnovers. When it was time to order, we had a lovely order taker that was very helpful in helping us pick the best items from the menu. It wasn't a difficult task as the menu was so concise and offered great options at reasonable prices.

Grilled beef, cheese, tomato jam, mustard mayo, pickle & burger ($10)
        Faye ordered a 'Salted Caramel' Milkshake ($8), a 'Pulled pork, Chur BBQ sauce, red slaw and fennel mayo' ($10) while I opted for a simple 'Grilled beef, cheese, tomato jam, mustard mayo & pickle burger ($10) & 'Milo' Milkshake ($8). We of course ordered a side of 'Sweet potato fries with garlic and lime.' ($5).
        Service was fast and everything came pretty much at the same time. The first thing that struck me were the polka-dot napkins! Love at first sight. Things were looking good so far. 
         The 'Salted Caramel' Milkshake was perfect. Not too sweet and just the right between salty and sweet. It was really a great partnership with Faye's pulled pork burger. The burger was moist, flavoursome and the pork was so succulent. Mix that in with the red slaw and fennel mayo it's a real winner. It's definitely a MUST. 
'Pulled pork, Chur BBQ sauce, red slaw and fennel mayo' ($10)
         My 'Beef burger' was delicious. They're very generous with their sauce which I love. Another great thing was the buns weren't soggy even mid-way through the meal. While the beef was cooked to a perfect medium-rare, juicy and full of flavour I'm a bit disappointed I couldn't try other burger selections. I feel that any burger place that can do a beef burger well, the chances their other burgers are better run highly. My 'Milo' milkshake was not too sweet so it didn't overpower the burger. While I enjoyed it, I feel I can make something similar at home so would definitely try other flavours next time. 
          I've never had proper sweet potato fries before. While they weren't all equally crunchy, they all had pocketfuls of flavour. The potato inside was creamy and melted with the lime and salty outside. Definitely a go for these fries. They made a very good first impression.


The entrance and 'CHUR' atmosphere inside/ decor
          The burgers are deceptively small. Being the food demolishers that we are, we both struggled to finish the shared sweet potato fries, milkshakes and burgers. So be careful when ordering. I suggest ordering one side between two.
           All in all, I'm glad we branched out. I have still yet to revisit 'CHUR Burger' but it's definitely on my list of things to do in 2014. On another note, I found out that 'Chur' actually means 'awesome' so the name is so fitting. If you're around the area, I definitely should check it out. Leave a comment below if you have and tell me about your experience there.

Nibble Away,
          Jo

How to: Choco-Cat Cupcakes with Peanut Butter frosting

Hey Nibblers!

         If you can't already tell by the title this is going to be one CAT-riffic post! To be quite honest, I'm actually not a cat person. In fact, I'm not really an animal person. It's not because I dislike animals, it's just I've never been around them enough to not be afraid of them. I blame my Mum though. She uses me as a human shield when a dog walks nearby. I think that's where my fear emulated from. 
         So why dedicate a recipe to cats you ask? It's all in the name of friendship. My amazing nursing buddy Therese is turning 21 in a couple days time. She's a total cat-lover. While I would have loved to buy her a cat, I can't afford the expenses. So, I went for the next best option I could think of. Choco-CAT Cupcakes. Want to know how I made them? Just keep reading.

What you'll need:
Makes approx. 15 medium sized cupcakes


- 170g of plain flour
- pinch of salt
- 2 tsp. baking powder
- 2 eggs
- 3/4 cup of cocoa 
- 50g unsalted butter (softened to room temperature)
- 1 cup of white sugar
- 1 cup of milk
- 3/4 tsp. Vanilla Essence

Fluffy Butter and Sugar Mix
How to: Choco-cat Cupcake component

1. Pre-heat oven to 180 degrees Celcius
2. Line tin with cupcake paper
3. Sift together flour, salt, baking soda, baking powder and cocoa in a medium mixing bowl
4. Beat together the softened butter, vanilla essence and white sugar using hand mixer in a large mixing bowl until well combined and fluffy (approx. 3 minutes)
5. Add eggs in one at a time until mixed
6. Add 1/3 of the dry ingredients into the butter/sugar mixture and hand mix until well combined
Cupcake batter
7. Add 1/3 of the milk and mix until well incorporated. Remember to scrape the sides of the bowl
8. Repeat steps 5 & 6 until all ingredients are all combined
9. Spoon cupcake mixture evenly and 3/4 of the way up 
10. Pop into the oven for 18 minutes checking with a skewer at the end to see if it's cooked
11. Rest the cakes for 5-10 minutes before consumption


Peanut Butter frosting
White butter compared to peanut butter
- 250g of unsalted butter (softened to room temperature)
- 150g of sifted icing sugar
- 3 tsp. Vanilla Essence
- 2 Tbs. of milk
- 2/3 cups of smooth peanut butter

How To:
1. Using a hand-mixer, beat the softened butter for 5 minutes.
           (The butter should change from a yellow to off-white colour)
2. Add 1/2 of the sifted icing sugar, continuously mixing until well combined
3. Add milk & Vanilla and mix 
4. Add remaining icing sugar and mix until well combined remembering to scrape the sides of the bowl. Mix for another 3 minutes
5. Mix in the peanut butter until well incorporated 
             The frosting should now be ready. It should stay on your spatula unless you force it down yourself.
                 Note:  If the frosting is too sloppy, add more icing sugar. If your frosting is too dense, add a Tbs. of milk.
                             If you have leftover buttercream frosting, don't worry! You can pop it into the fridge for 3-5 days in an                                  airtight container or up to 3 months in the freezer.

Assemble Cats!
1. Pipe two arrows about 1cm from the edge for the Cat ears
2. Two dots for eyes
3. A small 1-2cm line from the half way point of the cupcake for the nose bridge with two minor arcs to form the nostrils
4. Add three whiskers to the left and right sides of the Cat's cheeks
5. Outline the cupcake for definition and voila! You're finished

Happy 21st Birthday Tree <3

        I hope you all loved this fun Choco-Cat Cupcake post! These turned out to be deliciously moist and were great the day after. The peanut butter frosting added an extra boost to the flavour and is so easy to make. If you do give these a go, leave a comment below or share your masterpieces on instagram/ twitter and tag @nibble_jox so I can see them.
        Hope you all have an amazing day and week.

Meow!
Nibble Away,

            Jo.
Related Posts Plugin for WordPress, Blogger...